
The New Heavyweight: Why the Canon C400 is the Ultimate Vegas Production Workhorse
Las Vegas is a city of extremes—high-stakes shoots, blazing desert sun, and neon-drenched nightscapes. To capture it all, you need a camera that doesn’t just keep up but raises the bar.
At F11 Rentals, we’re committed to putting the industry’s best glass and sensors in your hands. That’s why we are thrilled to announce that the Canon EOS C400 6K Cinema Camera has officially joined our rental fleet.
Whether you’re shooting a high-end music video on our cyclorama stage or a documentary out in the Valley of Fire, here is why the C400 is about to become your new favorite “go-to” rig.
1. A Sensor Built for the “Vegas Glow”
The heart of the C400 is its brand-new 6K Full-Frame Back-Illuminated (BSI) sensor. This isn’t just about resolution; it’s about light. The BSI design allows for 16 stops of dynamic range, capturing incredible detail in both the harsh desert highlights and the deep shadows of a dimly lit lounge.
2. Triple Base ISO: Kill the Noise
Night shoots on the Strip just got a whole lot easier. The C400 features Triple Base ISO (800 / 3,200 / 12,800).
-
ISO 800: For your controlled studio setups here at F11.
-
ISO 3,200: For those golden hour transitions.
-
ISO 12,800: For capturing the city lights with virtually no noise. This means you can keep your aperture where you want it without sacrificing a clean image when the sun goes down.
3. Autofocus You Can Actually Trust
We know, we know—”real cinematographers use manual.” But when you’re on a gimbal or chasing a subject through a crowded casino, the Dual Pixel CMOS AF II is a lifesaver. It features improved face, eye, and even body tracking that stays locked on your subject so you can focus on the composition.
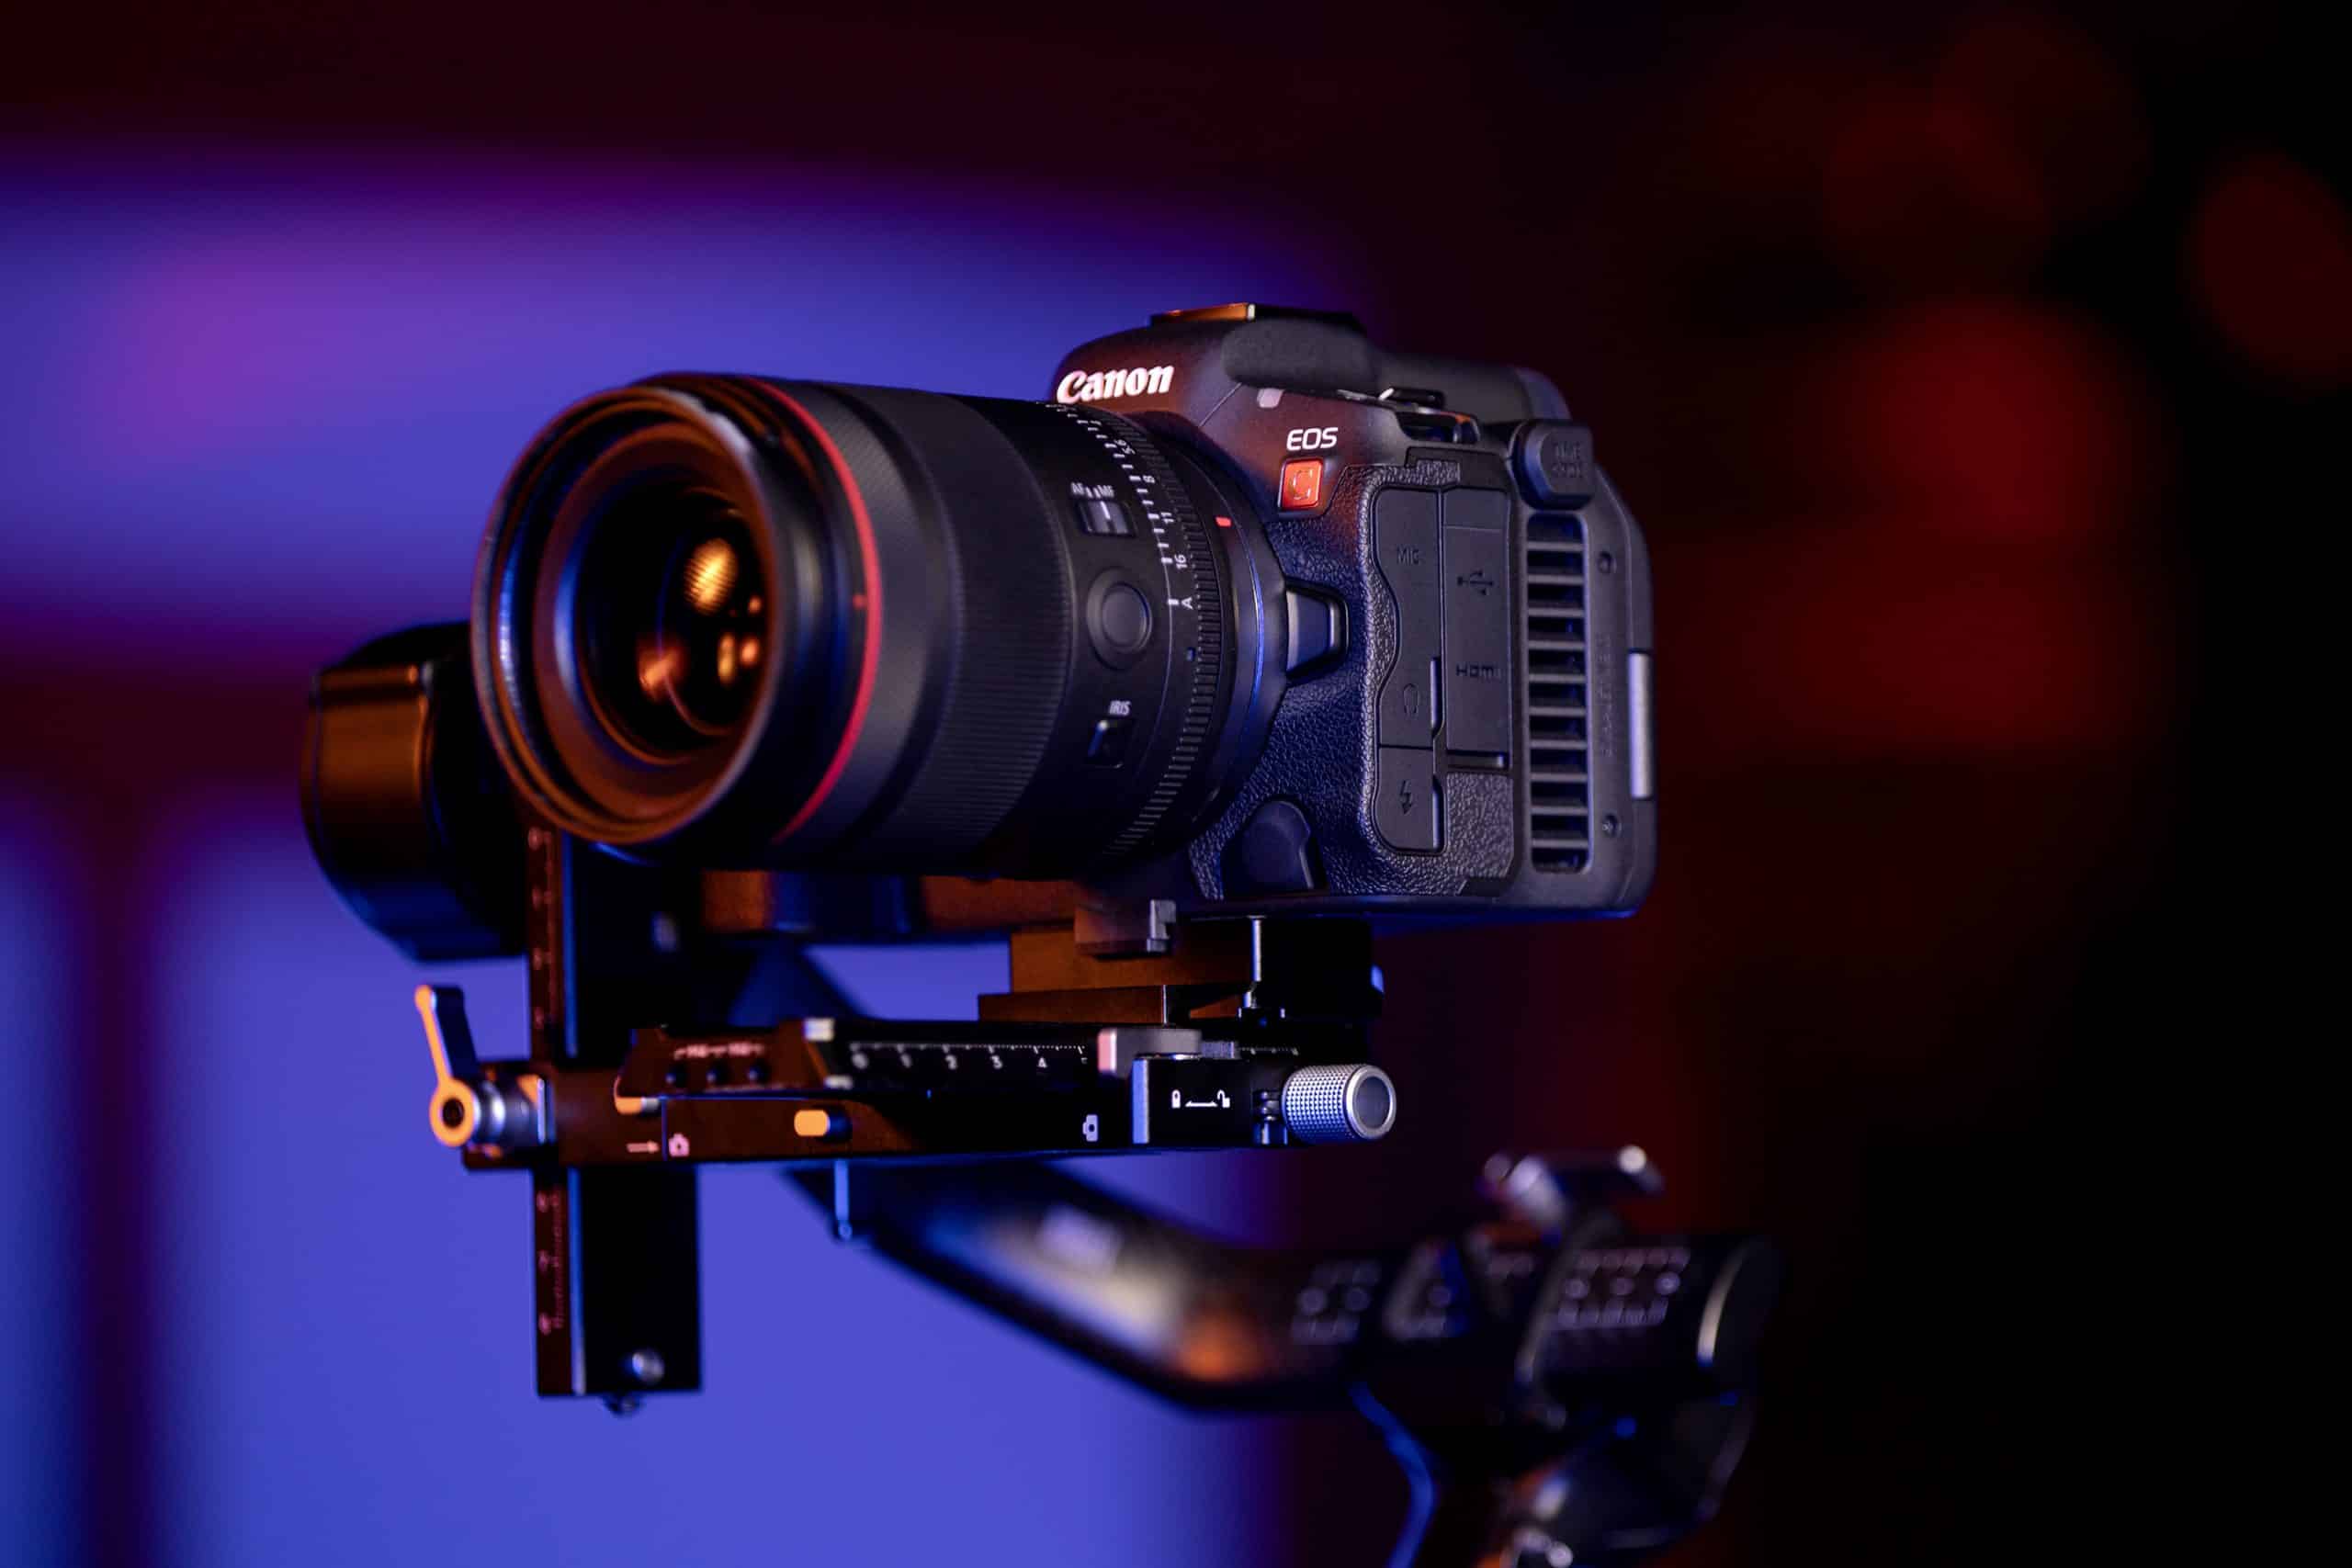
4. Native RF Mount (with EF & PL Versatility)
The C400 uses the high-speed RF mount, giving you access to Canon’s sharpest modern glass. But don’t worry—if you’ve got a favorite set of vintage primes or want to use our [F11 Lens Collection], we have the adapters to make it happen.
-
RF to PL: For that high-end cinema look.
-
RF to EF: To utilize the workhorse lenses you already know and love.
Pro-Tip for F11 Renters:
The C400 is a “Goldilocks” camera. It has the professional I/O (12G-SDI, Mini-XLRs, Timecode) of the C500 Mark II, but in a body that’s compact enough to balance on a DJI RS3 or RS4 Pro gimbal. It’s the perfect middle ground for one-man-band shooters and full-scale crews alike.
Ready to see what the C400 can do?
Don’t just take our word for it—come by the shop and see it for yourself. Whether you’re booking time in our three-walled cyclorama studio or heading out on location, we’ve got the C400 kits ready to roll.
F11 Rentals is your home for Las Vegas production gear, studio space, and expert support. From the “Producer’s Deck” to our quiet, climate-controlled sound stage, we’ve built this space for you. Let’s make something epic.
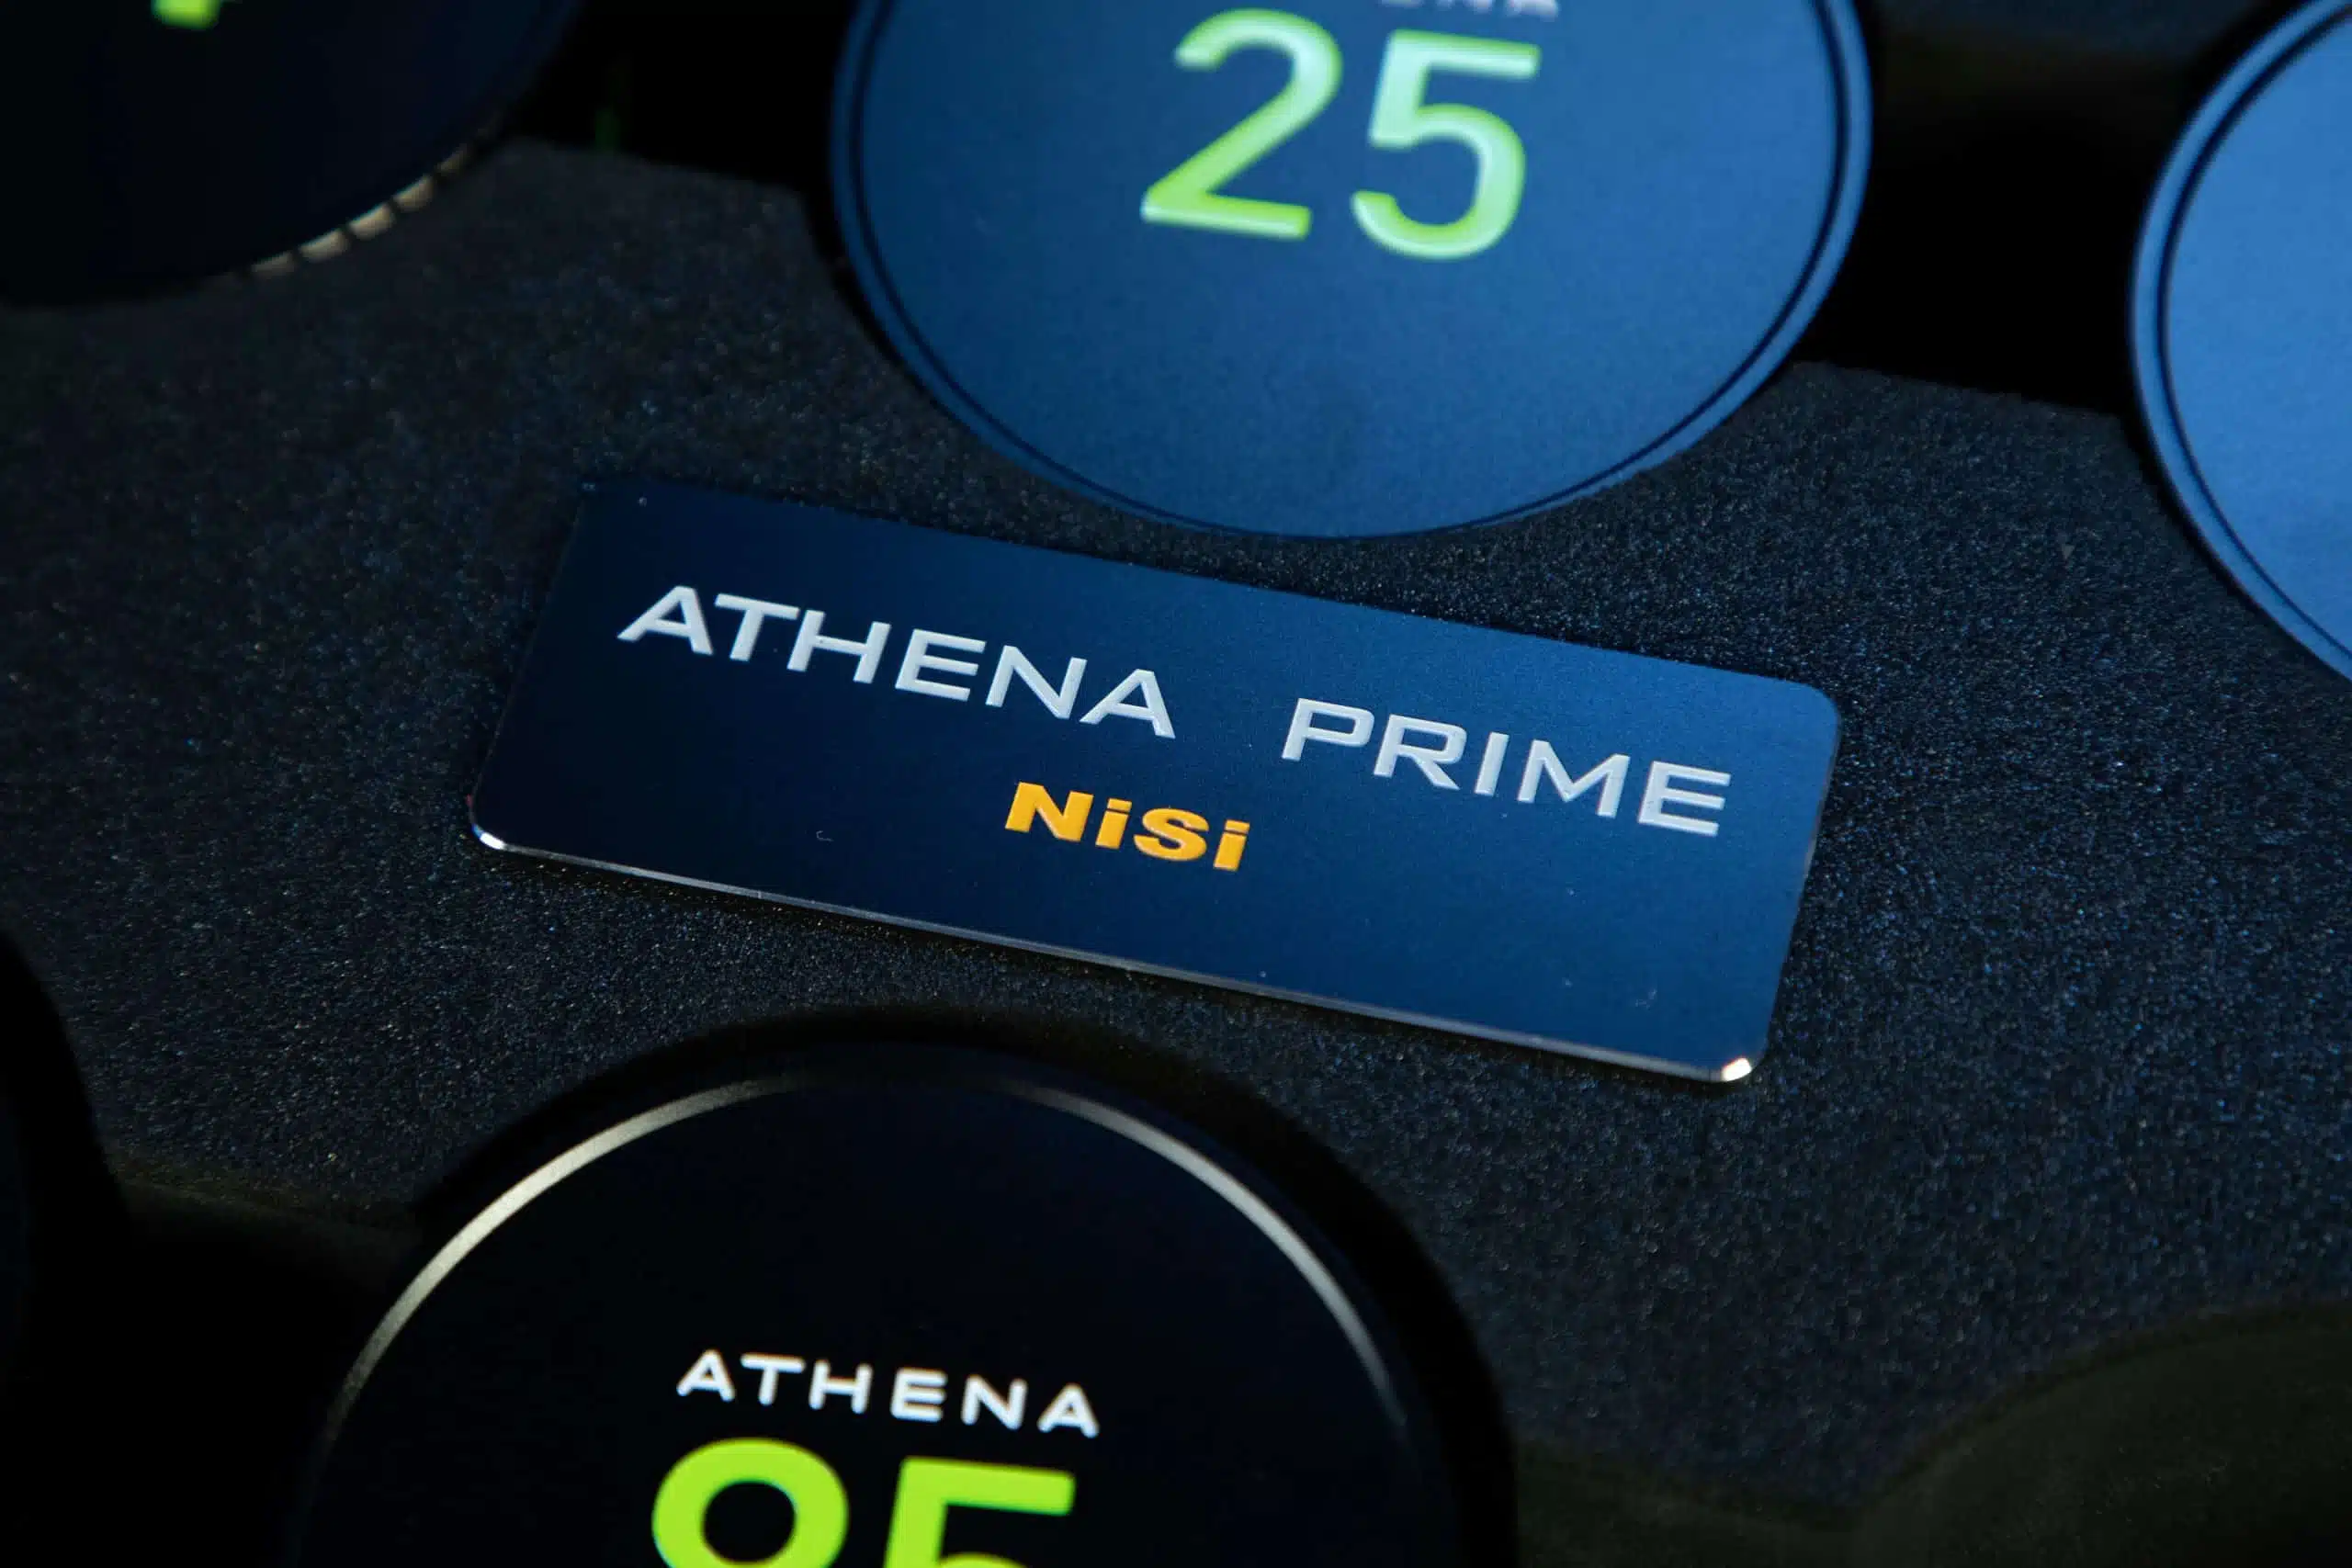
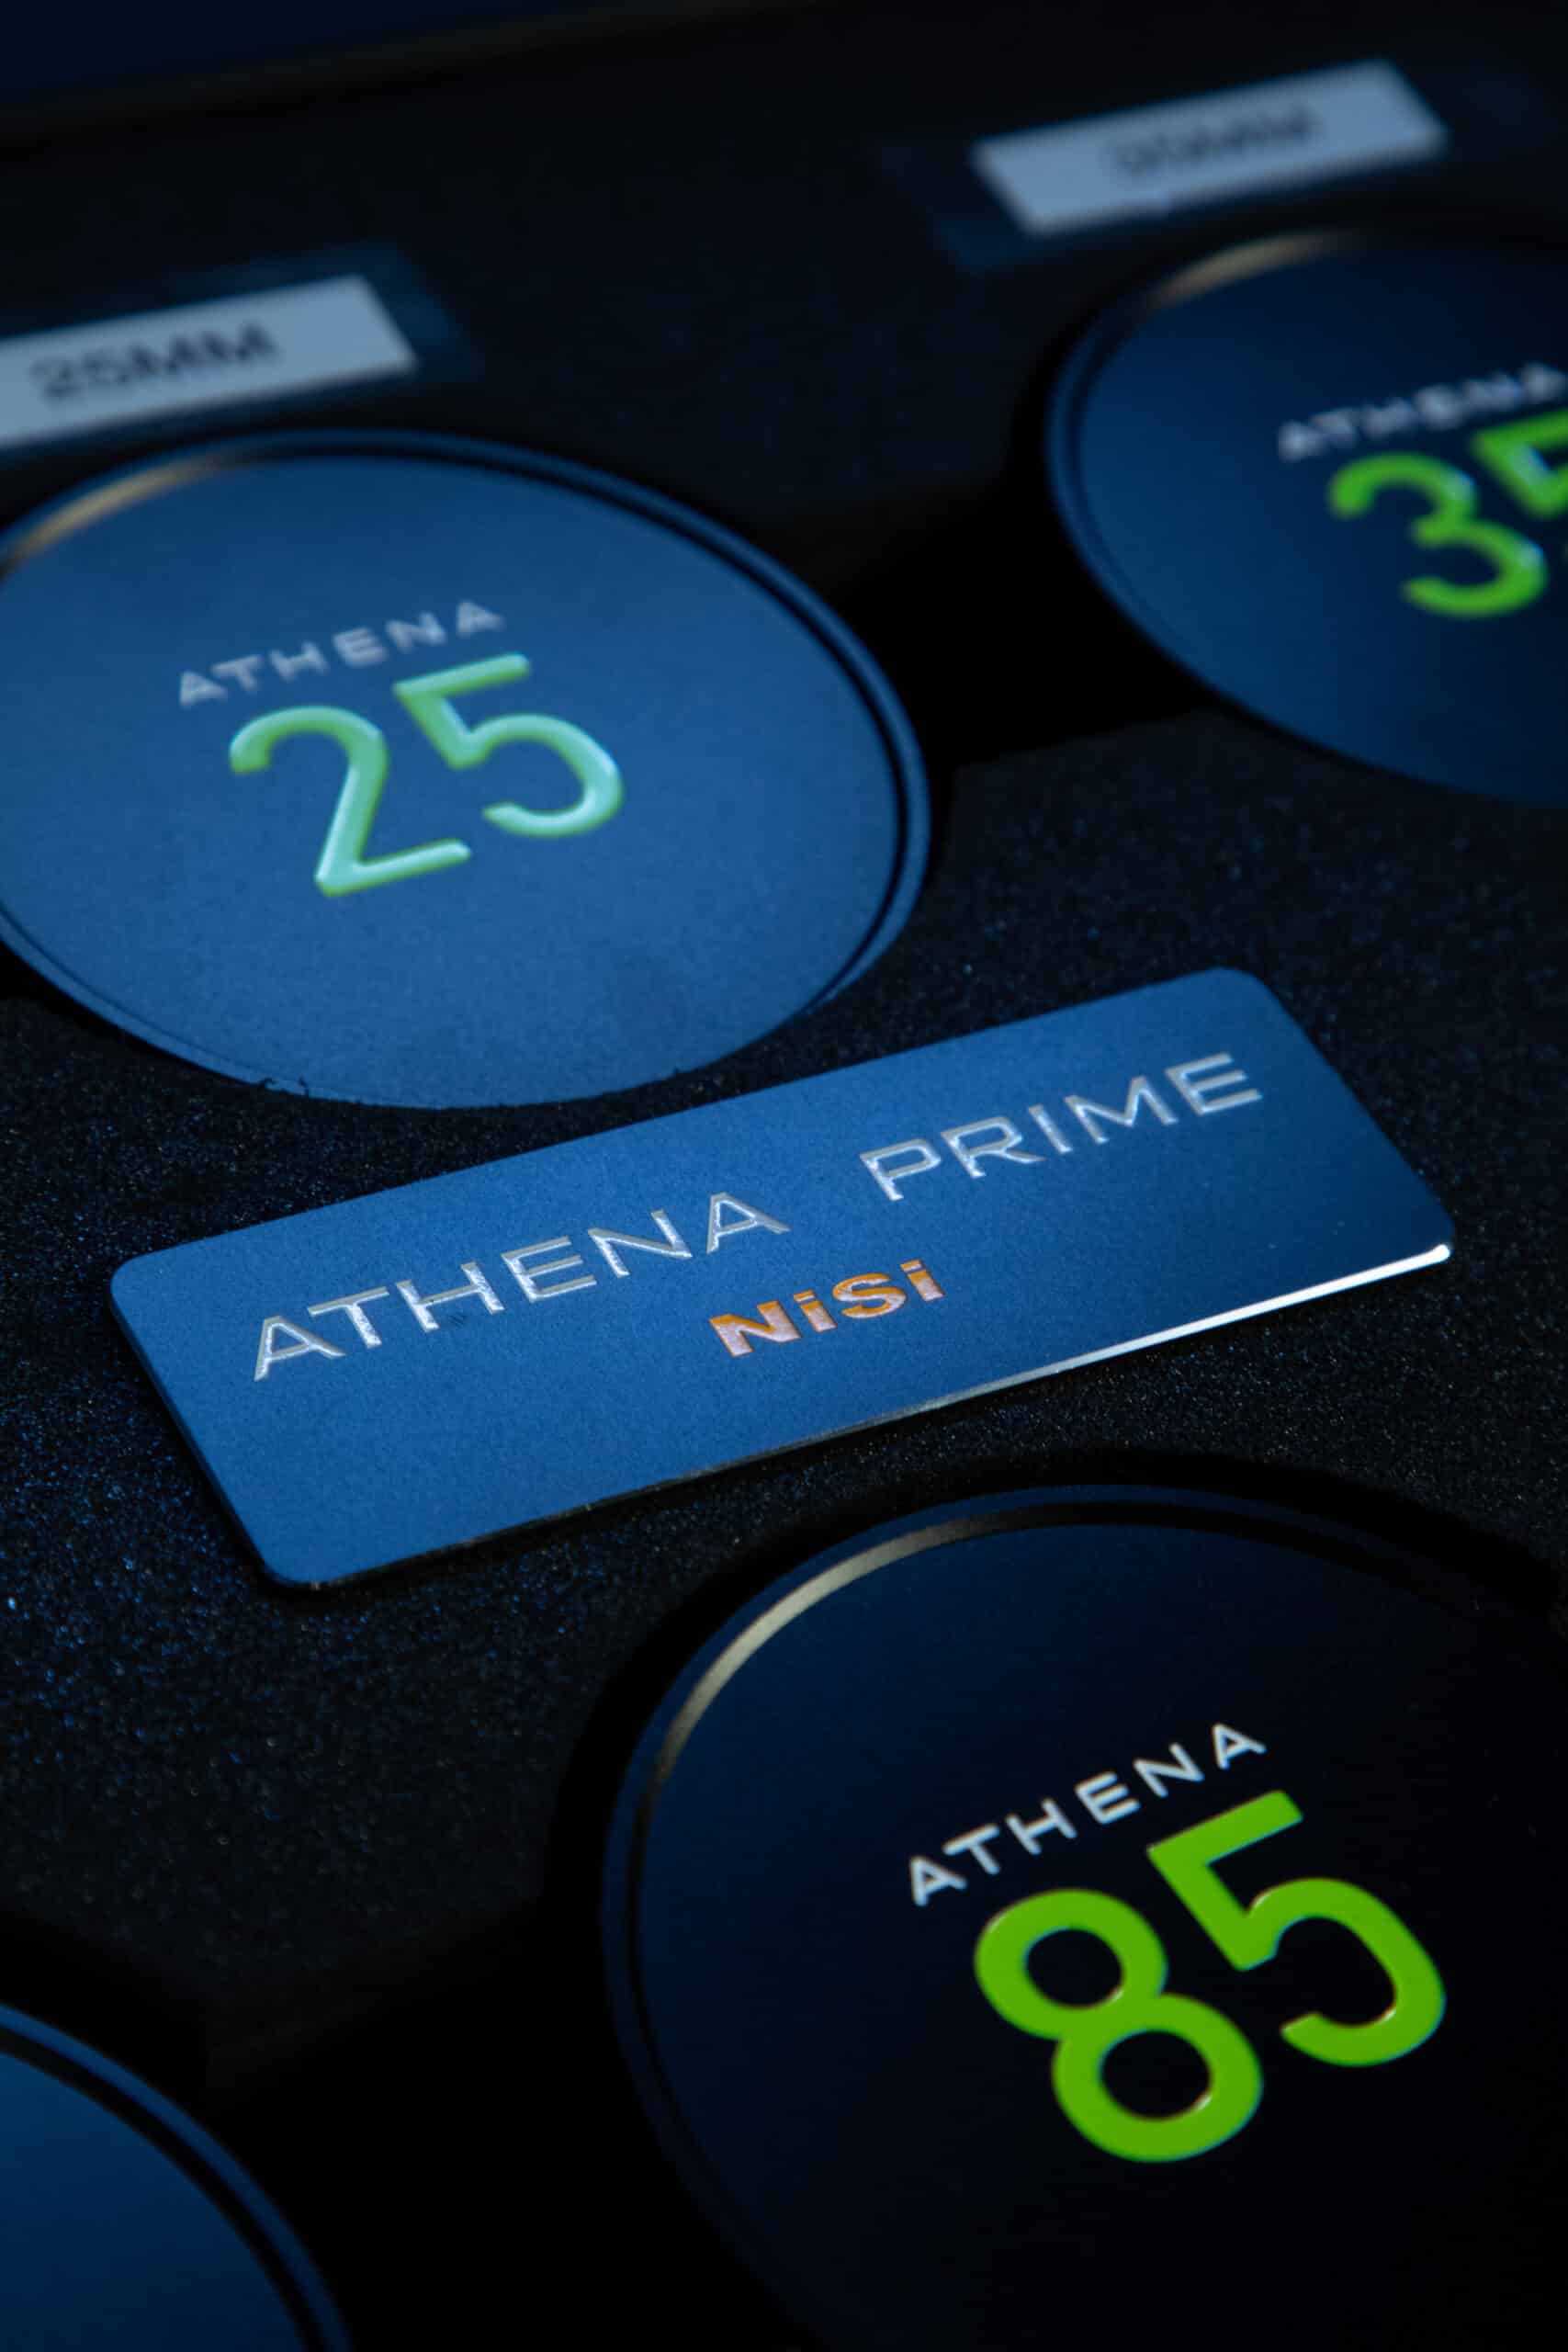
NiSi Athena Prime Lenses: The New Gold Standard for Cinematic Production in Las Vegas
When you’re shooting in Las Vegas—a city defined by its high-contrast neon lights, sprawling desert landscapes, and world-class studio spaces—you need glass that can keep up. At F11 Rentals, we are committed to providing filmmakers with gear that balances performance and efficiency. That’s why we’re excited to highlight the NiSi Athena Prime Lens Series in our rental inventory.
These lenses meet the rigorous demands of cinematography, offering the perfect solution for budget-conscious filmmakers and veteran DPs alike. Here is why you need them on your next set.
Why Choose NiSi Athena for Your Next Shoot?
1. Sharp Lenses for New Cameras
First, the Athena series uses a huge 46mm image circle. This big size makes them the perfect fit for large sensors on cameras like the Sony FX6 or the Canon C400, which we rent here. On top of their size, these lenses give you great image quality with very little color fringing, making sure your video looks sharp everywhere.
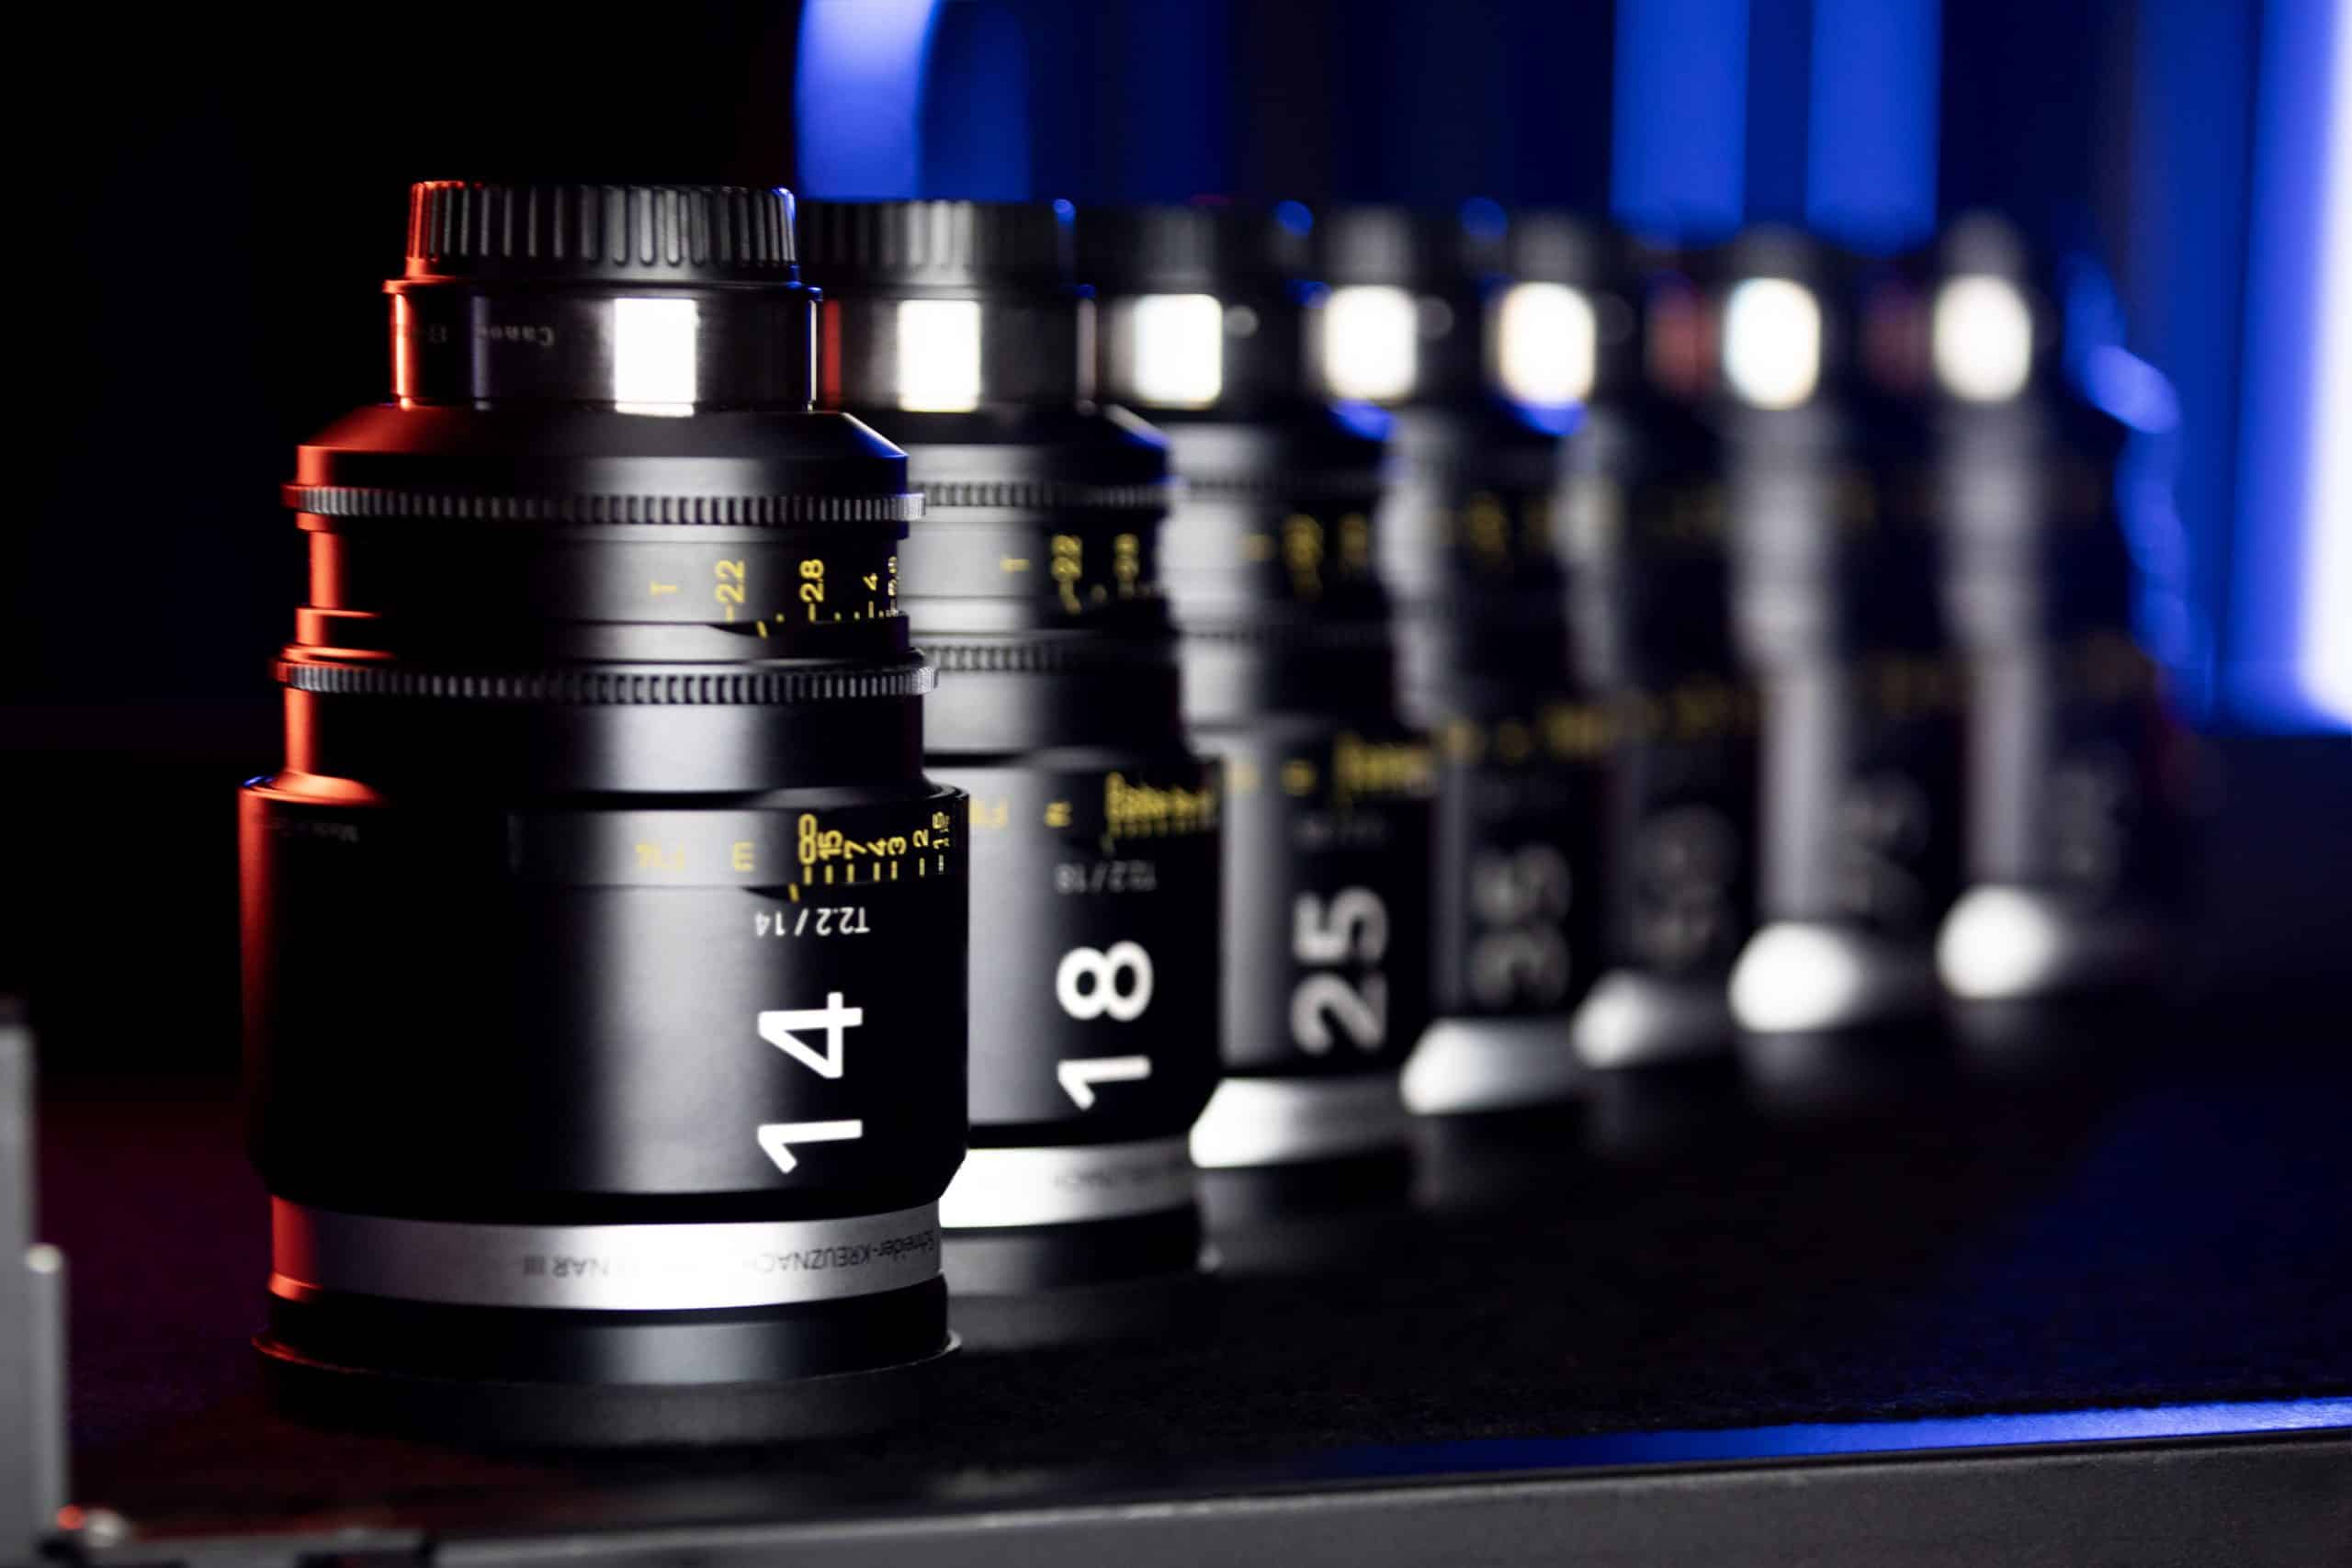
2. Same Size and Weight for Fast Swaps
Efficiency is crucial on set. That’s why every lens in the Athena kit (from the wide 14mm to the close-up 85mm) is built to be the same size and weight.
-
No Re-Balancing: You can switch lenses quickly on your gimbal or drone without having to adjust it.
-
Same Gears: Importantly, the focus and iris rings are in the exact same spot on every lens. This means you won’t need to move your follow focus motors when you change lenses.
3. Great for Low Light
As you know, Las Vegas looks best at night. Because of a fast T1.9 aperture across most of the range, these lenses create beautiful, blurry backgrounds. Specifically, this speed lets you easily shoot the moody lights of a casino or the soft glow of the desert at dusk.
4. No Shifting Focus
Finally, nothing looks worse than a frame that shifts when you focus. Therefore, the Athena primes are designed to stop the image from moving when you adjust focus. The result? Your shot stays steady and professional every time.
Technical Specs at a Glance:
| Feature | Specification |
| Focal Lengths | 14mm, 25mm, 35mm, 50mm, 85mm |
| Max Aperture | T1.9 (14mm is T2.4) |
| Focus Rotation | 300° for precise pulls |
| Front Diameter | 80mm (matched across the set) |
| Filter Thread | 77mm (except 14mm) |
| Markings | Fluorescent for low-light visibility |
The F11 Rentals Difference
Located minutes from the Las Vegas Strip, F11 Rentals is more than just an equipment house; we are your production partner. When you rent the NiSi Athena primes from us, you get:
-
Meticulously Maintained Gear: Every lens is tested and cleaned before it leaves our shop.
-
Production Synergy: Moreover, you can pair these lenses with our in-house cyclorama studio for a complete production solution.
The Hybrid Powerhouse: Rent the Canon R5 C from F11 Rentals Las Vegas
At F11 Rentals, we are committed to providing filmmakers and content creators with the most versatile and high-performance gear on the market. That’s why we are thrilled to feature the Canon EOS R5 C Mirrorless Cinema Camera. It’s a true hybrid machine that’s redefining what a single camera body can do.
Bridging the gap between the acclaimed stills performance of the EOS R5 and the professional video capabilities of the Cinema EOS line, the R5 C is built for the demanding, fast-paced world of modern production.
Key Features That Make the R5 C a Rental Star
The R5 C isn’t just a camera; it’s an all-in-one production tool. Here’s why it belongs on your next Las Vegas Shoot:
- 8K/60P Cinema RAW Light: Capture stunning 12-bit RAW video internally at up to 60fps (with external power). This incredible resolution and bit depth offer unparalleled flexibility in post-production for cropping, stabilization, and color grading.
- Oversampled 4K: Don’t need 8K? The R5 C oversamples its 4K footage from the 8K sensor, resulting in unbelievably sharp and clean 4K files—perfect for high-end delivery.
- Unlike its mirrorless predecessor, the R5 C features an internal cooling fan. This dedicated system virtually eliminates the risk of overheating. For example, it can be used long interviews, documentaries, or live event coverage.
- Dedicated Modes: A simple three-position power switch instantly transforms the camera, loading either the full-featured Cinema EOS menu (for video pros) or the familiar EOS R menu (for photographers).
- 45MP Stills: As a stills camera, it delivers 45-megapixel images with 20fps continuous shooting (electronic shutter), making it the ideal B-camera or main unit for projects requiring both high-res video as well as photography.
- Timecode In/Out: Essential for multi-camera shoots, the dedicated Timecode terminal ensures seamless synchronization in post-production.
- RF Mount Versatility: Access Canon’s cutting-edge RF lens line, or use an adapter for full compatibility with your existing collection of EF lenses. Additionally, the ability to use a wide variety of glass makes this camera incredibly adaptable to any project.
- Dual Pixel CMOS AF II: Canon’s renowned autofocus system, with advanced subject tracking, Eye, Face, and Head Detection, guarantees sharp, reliable focus—even when shooting high-frame-rate 4K or 8K.
Perfect for the Las Vegas Production Market
-
Commercials & Corporate: The high-resolution 8K capture and oversampled 4K footage provide pristine quality for clients who demand the best.
-
Event Coverage: From studio to conventions, the active cooling allows for worry-free, continuous rolling when capturing unrepeatable moments.
-
Music Videos & Short Films: Pairing the R5 C with our extensive selection of Canon RF and EF lenses gives you that big-budget cinematic look without the hefty camera body.
.
Who Should Rent the Canon EOS R5 C?
-
Documentary Filmmakers: Its compact size, active cooling, and high-resolution capture make it perfect for run-and-gun shooting where quality and reliability are paramount.
-
Corporate and Commercial Crews: The ability to shoot top-tier video and professional stills with a single camera streamlines production while saving space in the gear truck.
-
Indie Cinematographers: Looking for that cinematic edge on a budget? The 8K RAW output and Cinema EOS features provide a huge return on your rental investment.
Ready to elevate your production?
The Canon EOS R5 C is waiting for you at F11 Rentals. All in all, its compact, robust body is ready to deliver the high-end image quality. Moreover, it offers the professional features your project deserves.
Click here to check availability and book your Canon EOS R5 C rental today!
Unleash the Cinematic Power: The Schneider Xenar III EF Prime Lens Kit at F11 Rentals, Las Vegas!
Are you a filmmaker or production company looking for the absolute best production gear rentals in Las Vegas? The search for exceptional optics ends here. At F11 Rentals, we’re thrilled to feature a set that is quickly becoming a favorite for its unique cinematic look and operational excellence: the Schneider Xenar III EF Lens Kit.
Why Choose Prime Lenses for Your Vegas Production?
For top-tier film and video projects, as well as high-end commercials and everything in between shot right here in the entertainment capital of the world, a dedicated set of prime lenses delivers performance and artistic control that nothing beats.
- Superior Image Quality: Because manufacturers build primes like the Schneider Xenar IIIs for a single focal length, they allow for simpler, highly optimized optics. Consequently, these optics deliver sharper images, higher contrast, and better color than typical zoom lenses.
- Faster Apertures (T-Stops):A fast T-stop (as low as T2.0) provides shallow depth of field, separating your subject from busy backgrounds and allowing for low-light shooting..
- The “Look”: Every prime lens has a character. Filmmakers celebrate the Schneider Cine-Xenar III lenses for their superb resolution, fantastic contrast, and beautiful, round bokeh thanks to their 18-blade iris. This gives your footage a creamy, professional cinematic feel.
The Technical Edge: Why the Schneider Xenar III EF Kit Stands Out
The Schneider Xenar III primes are designed from the ground up for professional digital cinematography, making them the perfect addition to our premium Las Vegas production gear rentals.
- Consistent Mechanics: Because all lenses share consistent mechanics (dimensions, focus/iris gear positions, and front diameter), therefore they enable quick, no-adjustment lens swaps on set. Matte boxes and follow focus will not need much adjusting.
- Virtually Zero Breathing: Focus breathing is significantly a common distraction. The Xenar IIIs exhibit virtually no breathing, ensuring your cinematic focus pulls are smooth and professional.
- EF Mount Versatility: This kit comes in the popular EF mount. EF mount offers flexibility for cameras like Canon C-series, RED, and Blackmagic; F11 Rentals also offers adapters.
- Flawless Color Matching: Therefore, shoot your entire project knowing that every lens in the kit is perfectly color-matched, minimizing post-production color correction
Level Up Your Next Las Vegas Shoot
Whether you’re capturing the neon glow of Fremont Street, the dramatic architecture of a world-class resort, or a high-octane action sequence in the desert, the Schneider Xenar III EF Lens Kit from F11 rentals will deliver.
Don’t settle for less if your project demands the best. Rent the prime lenses that industry professionals trust.
Ready to reserve the Schneider Xenar III EF Lens Kit for your next Las Vegas production?
Vegas Production Powerhouse: Location Services and Talent Trailer Rentals for F11 Shoots
Las Vegas is a city of limitless backdrops, but turning a creative vision into a successful on-location shoot requires more than just luck. For F11 Rentals clients—from indie filmmakers to seasoned videographers—partnering with professional location services is the key to unlocking the best of Sin City’s scenery without the logistical headaches.
Here’s why connecting your F11 Rentals equipment and studio needs with Vegas Location Services is the ultimate production power play:
Beyond the Strip: Unearthing Hidden Gems
You’ve secured the perfect Aputure lights and Cinema camera gear from F11 Rentals, but where should you point them? Las Vegas location services excel at:
- Scouting Expertise: They go beyond the casinos, maintaining curated databases of diverse settings—from private luxury homes and gritty industrial warehouses as well as remote desert landscapes and vibrant downtown alleys.
Streamlined Logistics & Support
Having the right gear is only half the battle; getting it to the right place—and keeping the shoot running smoothly—is where the real magic happens.
- Permitting & Legal: Location services handle all the necessary permits, approvals, and legal agreements with property owners and local authorities. Therefore ensuring your shoot is compliant as well as preventing costly delays.
- Basecamp & Production Trailers: They manage the on-site necessities, setting up basecamps, arranging production trailers.
- Experienced On-Site Coordination: Their team acts as a liaison with local stakeholders, providing essential on-the-ground support to minimize disruptions and keep the focus on capturing the perfect shot.
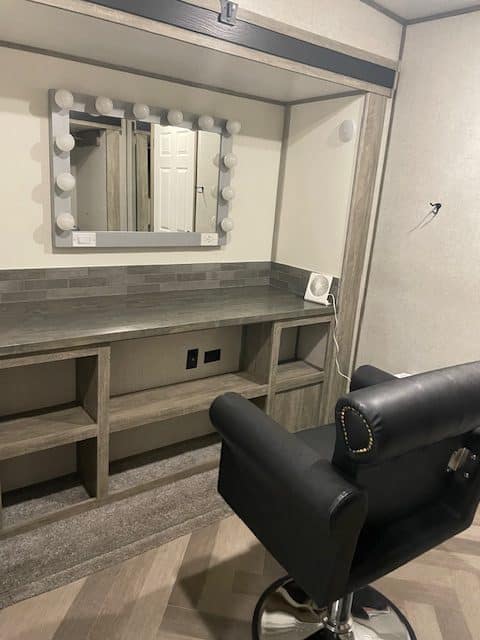
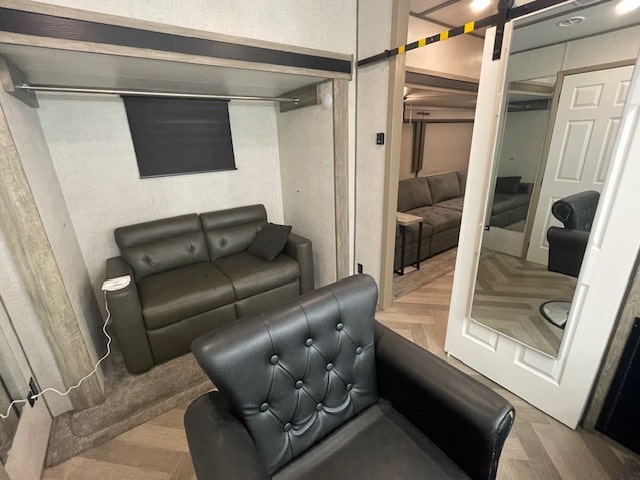
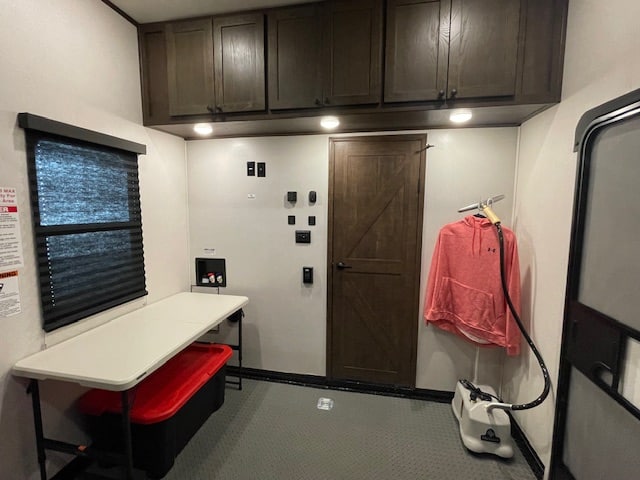
The On-Set Sanctuary: Premium Talent Trailer Rentals
For talent and key crew members, the time between takes is vital for preparation and rest. Not only are Talent trailers more than just mobile, additionally, they are also mobile green rooms, production offices, and wardrobe units. To maintain a professional, comfortable set environment.
Working with vendors like Vegas Location Services ensures your set is equipped with the right mobile facilities:
- Talent Trailers (The VIP Suite): These are private, luxurious spaces designed for actors and directors. They often include comfortable seating, climate control, and private restrooms. Providing this level of comfort is key for high-profile talent to stay relaxed and ready for peak performance in any event.
- Hair & Makeup and Wardrobe Trailers: Specialized trailers are essential for maintaining the visual integrity of your production. They feature professional-grade vanity stations with optimal lighting, hanging space, as well as utility connections for steaming and preparation, keeping your wardrobe and makeup departments running like clockwork.
- Production & Office Trailers: These units serve as the command center for the shoot. They can be configured with desks, workstations, coupled with communication equipment, acting as a quiet, functional office on set.
Total Production Ecosystem
In Las Vegas, the production community is a well-oiled machine. Companies like F11 Rentals and Vegas Location Services often work in tandem, providing a one-stop-shop experience for production.
By using both services, you ensure:
- Your high-quality F11 camera, lighting, and grip equipment is delivered directly to a pre-approved, permitted location.
- You have experienced local crew options, from drone operators to camera teams, who are familiar with the area and can maximize the potential of the scouted site.
- Consequently resulting in low stress for your production team.
Don’t let the logistics of Las Vegas locations limit your creativity. Above all, by integrating your equipment rentals from F11 along with the expertise of a professional location services partner, you free up your creative team to do what they do best. Get your gear, book your location services, and make some Vegas magic.
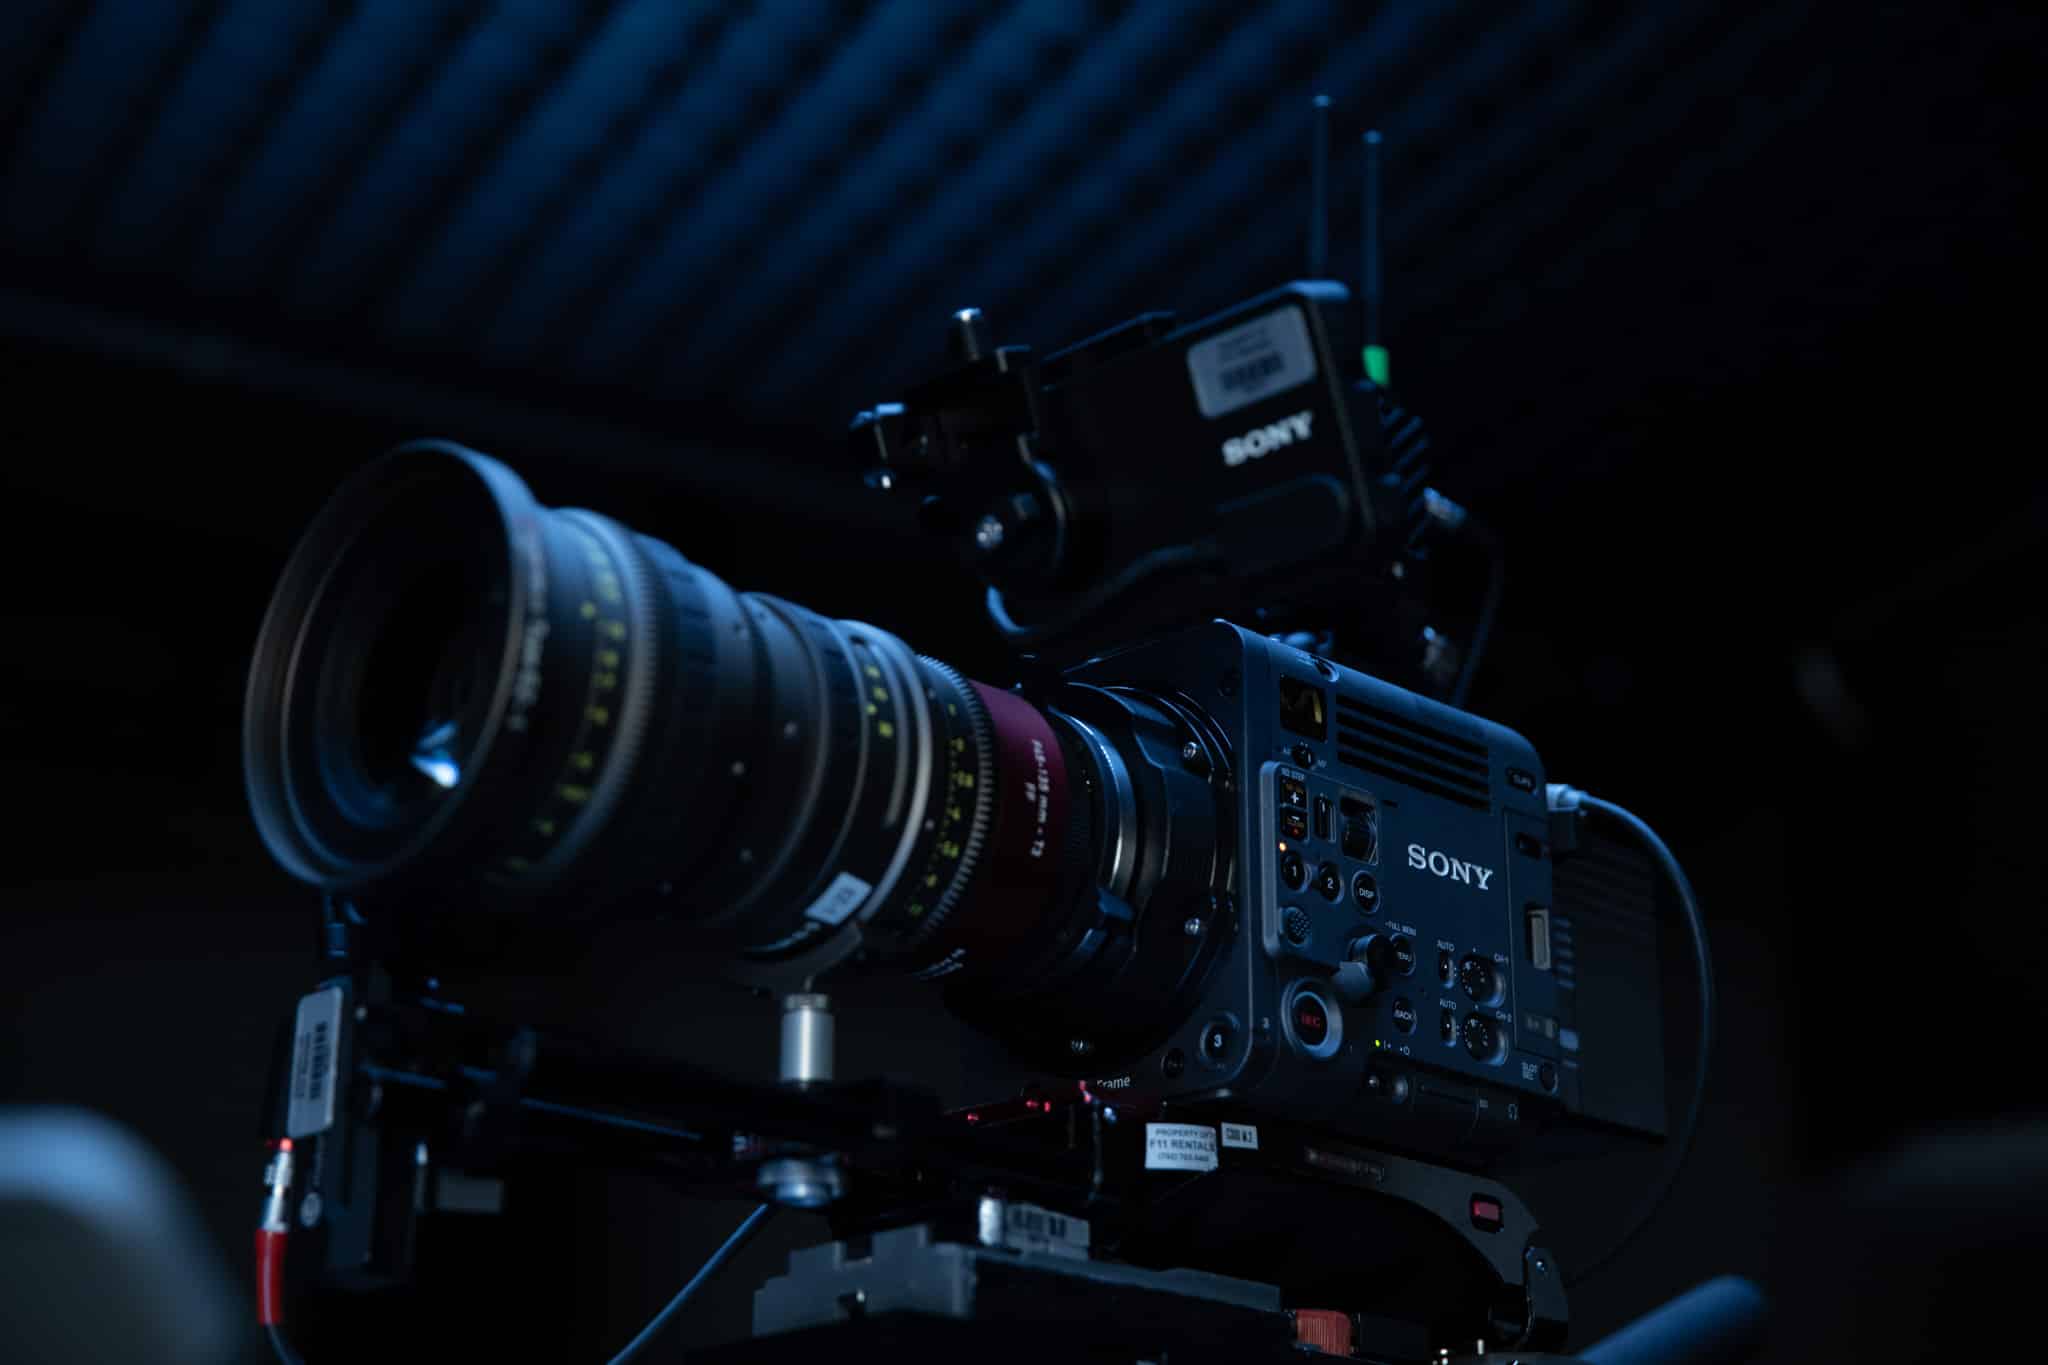
F11 Rentals Presents: The Sony BURANO - The New King of Run-and-Gun Cinema in Las Vegas
In the heart of Las Vegas, every shot needs to be as dynamic and captivating as the city itself. Therefore, having the right camera is non-negotiable. At F11 Rentals, we’re committed to equipping filmmakers and production crews with the latest and greatest tools. These tools bring their vision to life. That’s why we’re thrilled to announce the newest addition to our lineup: the Sony BURANO 8K Digital Cinema Camera. The Sony Burano Las Vegas availability allows local creators unparalleled access to top-tier technology.
Beyond the Specs: A Camera Designed for Filmmakers
Whether you’re capturing the vibrant chaos of the Strip, the sweeping landscapes of Red Rock Canyon, or an intimate interview in a quiet studio, the BURANO delivers. Here’s what makes it the ideal choice for your next rental:
- Compact Powerhouse: The BURANO is the lightest and most compact full-frame CineAlta camera from Sony. Making it undoubtedly a dream for handheld shooting, gimbal work, and any scenario where mobility is key. You get all the power of a cinema camera without the bulky rig.
- Stunning 8K Full-Frame Sensor: With its 8.6K full-frame CMOS sensor, the BURANO captures images with incredible detail and resolution. Its cinematic 16 stops of dynamic range mean you can handle the extreme contrasts of a sunny Las Vegas day and the low-light allure of a late-night shoot with ease, all while maintaining rich color and minimal noise.
- Dual Base ISO: Like the VENICE 2, the BURANO features Dual Base ISOs of 800 and 3200. This flexibility allows for exceptional low-light performance without sacrificing image quality, giving you more creative freedom on set.
- The First PL-Mount Camera with IBIS: This is a revolutionary feature. The BURANO is the world’s first digital cinema camera with a PL-mount to offer in-body image stabilization (IBIS). It provides 3-axis stabilization for PL lenses and a full 5-axis stabilization for Sony E-mount lenses, ensuring your shots are smooth and steady even when you’re on the move.
- Built-in Variable ND Filter: Say goodbye to fumbling with external ND filters. The BURANO has an electronic variable ND filter with a range from 0.6 to 2.1, giving you seven stops of control. This is a massive advantage in the constantly changing light conditions you’ll find around Las Vegas.
The BURANO is Your All-Access Pass to Las Vegas’s Diverse Locations
Las Vegas, in essence, is a city of a thousand different worlds, and the BURANO is the perfect camera to capture them all. Its compact size and powerful features make it a versatile tool for any type of production.
- For the Bustling Cityscape: Imagine a run-and-gun documentary through the neon-lit chaos of Fremont Street. The BURANO’s in-body image stabilization is a lifesaver for smooth, captivating handheld shots while you weave through crowds. The dual-base ISO and variable ND filter allow you to effortlessly transition from the bright sunlight of a downtown street to the shadowy, vibrant glow of the Neon Museum’s “Boneyard” at dusk.
- For the Natural Wonder: Just a short drive from the city, the dramatic red rock formations of Red Rock Canyon and Valley of Fire State Park demand a camera that can handle high-contrast landscapes. The BURANO’s 16 stops of dynamic range ensure you capture both the deep shadows in a crevice to the intensely bright sky.
- For High-Stakes Storytelling: Whether you’re shooting a narrative film in a luxurious suite or an action sequence on a rooftop overlooking the Strip, the BURANO’s full-frame sensor and cinematic color science deliver a truly high-end, theatrical look. The ability to record in 8K provides incredible flexibility for reframing and punching in during post-production without losing image quality.
- Lastly, For the Intimate Interview: When you’re filming a sit-down with an artist in the Arts District or a quiet conversation at a coffee shop, the BURANO’s compact form factor and outstanding low-light performance allow you to get close to your subject without an imposing rig. The superb color rendition and detail from the 8.6K sensor will make every interview look as if it were shot for the big screen.
Rent the Sony BURANO at F11 Rentals
F11 Rentals is proud to be your go-to source for the Sony BURANO in Las Vegas. Our team is dedicated to providing you with not only the best gear but also the expertise and support you need for a successful production.
Ready to elevate your next project? The Sony BURANO is here, and it’s ready to roll.
Contact F11 Rentals today to book the Sony BURANO for your next shoot in Las Vegas!
The Canon C80 - Your New Go-To Camera for Las Vegas Productions
At F11 Rentals, we’re always looking to bring the latest and greatest cinema tools to the filmmaking community here in Las Vegas. That’s why we’re thrilled to announce the arrival of the Canon EOS C80. Whether you’re a local DP, a production company, or a content creator looking to elevate your next project, the C80 is the Go-to camera for your Las Vegas Shoot. For Canon C80 rentals in Las Vegas, F11 Rentals is your best choice!
Canon C80 Cinematic Quality, Compact Form Factor for your Las Vegas Production
The C80 is a perfect marriage, with the professional Cinema EOS line and on the other hand also has the lightweight ergonomics of a mirrorless camera. It’s built around a brand-new 6K full-frame, back-illuminated stacked CMOS sensor. What does this mean for you?
- Exceptional Image Quality: The C80 delivers stunning 6K resolution, giving you incredible detail and flexibility in post-production. Even if you’re delivering in 4K, the 6K oversampling creates an overall richer detailed image.
- Low-Light Performance: The new sensor provides an exceptionally clean image with less noise, making the C80 an ideal choice for the vast range of lighting situations you’ll find in Las Vegas. From both the bright desert sun, in addition to the moody lights of a casino floor, the Canon C80 has you undoubtedly covered.
- Triple Base ISO: With base ISOs of 800, 3200, coupled with an impressive 12,800, the C80 is built to perform in any lighting condition without compromising range. This is a massive advantage for run-and-gun shooting, when you can’t always control the light.


Features That Streamline Your Workflow, Perfect Rental for your Las Vegas Shoot
Canon has packed the C80 with features that will make your life on set easier along with additionally being more efficient. In Las Vegas, the Canon C80 will streamline your production workflow seamlessly.
- Next-Generation Autofocus: Canon’s renowned Dual Pixel CMOS AF has been upgraded to Dual Pixel CMOS AF II. It’s faster, more precise, and covers nearly 100% of the sensor. Not to mention, the EOS iTR AF X with deep-learning technology as well as provides reliable subject tracking for faces, heads, and bodies, ensuring your shots stay sharp.
- Built-in ND Filters: The C80 features a motorized internal ND filter wheel, allowing you to quickly and easily adjust exposure up to 10 stops. No more fumbling with screw-on filters—you can dial in the perfect look on the fly.
- Professional Connectivity: The camera features a 12G-SDI output, which is a significant upgrade compared to the C70. Given that, this provides a secure video signal for monitors and external recorders, a must-have for professional multi-camera setups.
The Canon C80 is the perfect camera for a wide range of productions, whether you’re shooting a narrative film, a high-end commercial, a music video, or a documentary. Despite Its compact size, the Canon C80 offers big-camera features making it incredibly versatile. Experience the convenience of Canon C80 rentals in Las Vegas today.
Ready to see what the C80 can do for your next project? Contact F11 Rentals today to reserve the Canon EOS C80 and get a quote for your rental. Let’s create something amazing together in Las Vegas with Canon C80 rentals in Las Vegas.

Shine Brighter Than the Strip: Introducing Aputure InfiniBars at F11 Rentals!
Las Vegas is all about dazzling lights and unforgettable visuals. At F11 Rentals, we’re constantly striving to equip your productions with the tools to achieve just that. We’re thrilled to announce the arrival of the Aputure Infinibars to our diverse inventory of Las Vegas camera rentals and Las Vegas production rentals!
These aren’t just any LED lights; Aputure InfiniBars are a game-changer for filmmakers, content creators, and lighting designers seeking ultimate flexibility, precision, and jaw-dropping effects. Whether you’re shooting a music video, a commercial, or a stunning corporate event, InfiniBars offer an unparalleled level of creative control.

What Makes Aputure InfiniBars a Must-Have?
All in all, the InfiniBars are designed for seamless integration and infinite possibilities. Here’s why they’re quickly becoming a favorite:
- Pixel-Perfect Control: Each InfiniBar features individual pixels, allowing for incredible lighting patterns, dynamic chases or subtle color. Imagine creating a mesmerizing backdrop or adding a touch of vibrant motion to your shots – it’s all possible with pixel control.
- Seamless Blending: Say goodbye to visible gaps! The unique design of InfiniBars allows them to connect seamlessly, creating continuous lines of light. This is perfect for building custom shapes and additionally crafting unique light sculptures.
- Built-in Battery & Versatile Power: With built in batteries, these lights offer freedom on set. Need to run them longer? We also provide the necessary power adapters to keep your creativity flowing without interruption.
- Robust & Ready for Action: Constructed with durable aluminum, these bars are built to withstand the trials of any production, ensuring reliability when you need it most.
- Intuitive Mounting Options: InfiniBars come with a variety of mounting solutions. Both Clamp-to-baby-pin adapters, 1/4-20″ threads, and magnetic spacers, making rigging quick and efficient.
Elevate Your InfiniBar Experience with Our Support Gear
To truly unleash the power of the Aputure InfiniBars, you’ll want the right supporting cast. At F11 Rentals, we have a comprehensive selection of production lighting Las Vegas essentials to complement your new InfiniBars:
- Stands and Grip Equipment: Firstly, from C-stands to rolling stands, we have everything to ensure stable and precise placement.
- DMX Control Systems: For advanced programming and intricate light shows, explore our DMX control systems that allow you to orchestrate every pixel and color with precision.
- Diffusion and Modifiers: Shape the light from your InfiniBars with our various diffusion materials and light modifiers. Whether you need a soft glow or a more directed beam, we have the tools to help you achieve your desired look.
- Power Solutions: Ensure uninterrupted power to your entire setup with our reliable power distribution units and cables.
Are You Prepared to Illuminate Your Upcoming Project?
The Aputure InfiniBars serve as a prime illustration of our dedication to providing the most cutting-edge Las Vegas camera rentals and Las Vegas production rentals directly into your hands. Whether you have years of experience under your belt or are embarking on your journey in the field, F11 Rentals possesses the necessary equipment and extensive knowledge to help bring your creative vision to life. Our offerings are designed to cater to the diverse needs of our clients, ensuring that every project is equipped with the required tools to succeed.
Reach out to us today to explore more about renting the Aputure InfiniBars and discover their remarkable impact on elevating your next production. Don’t hesitate to contact us and step closer to achieving your goals.

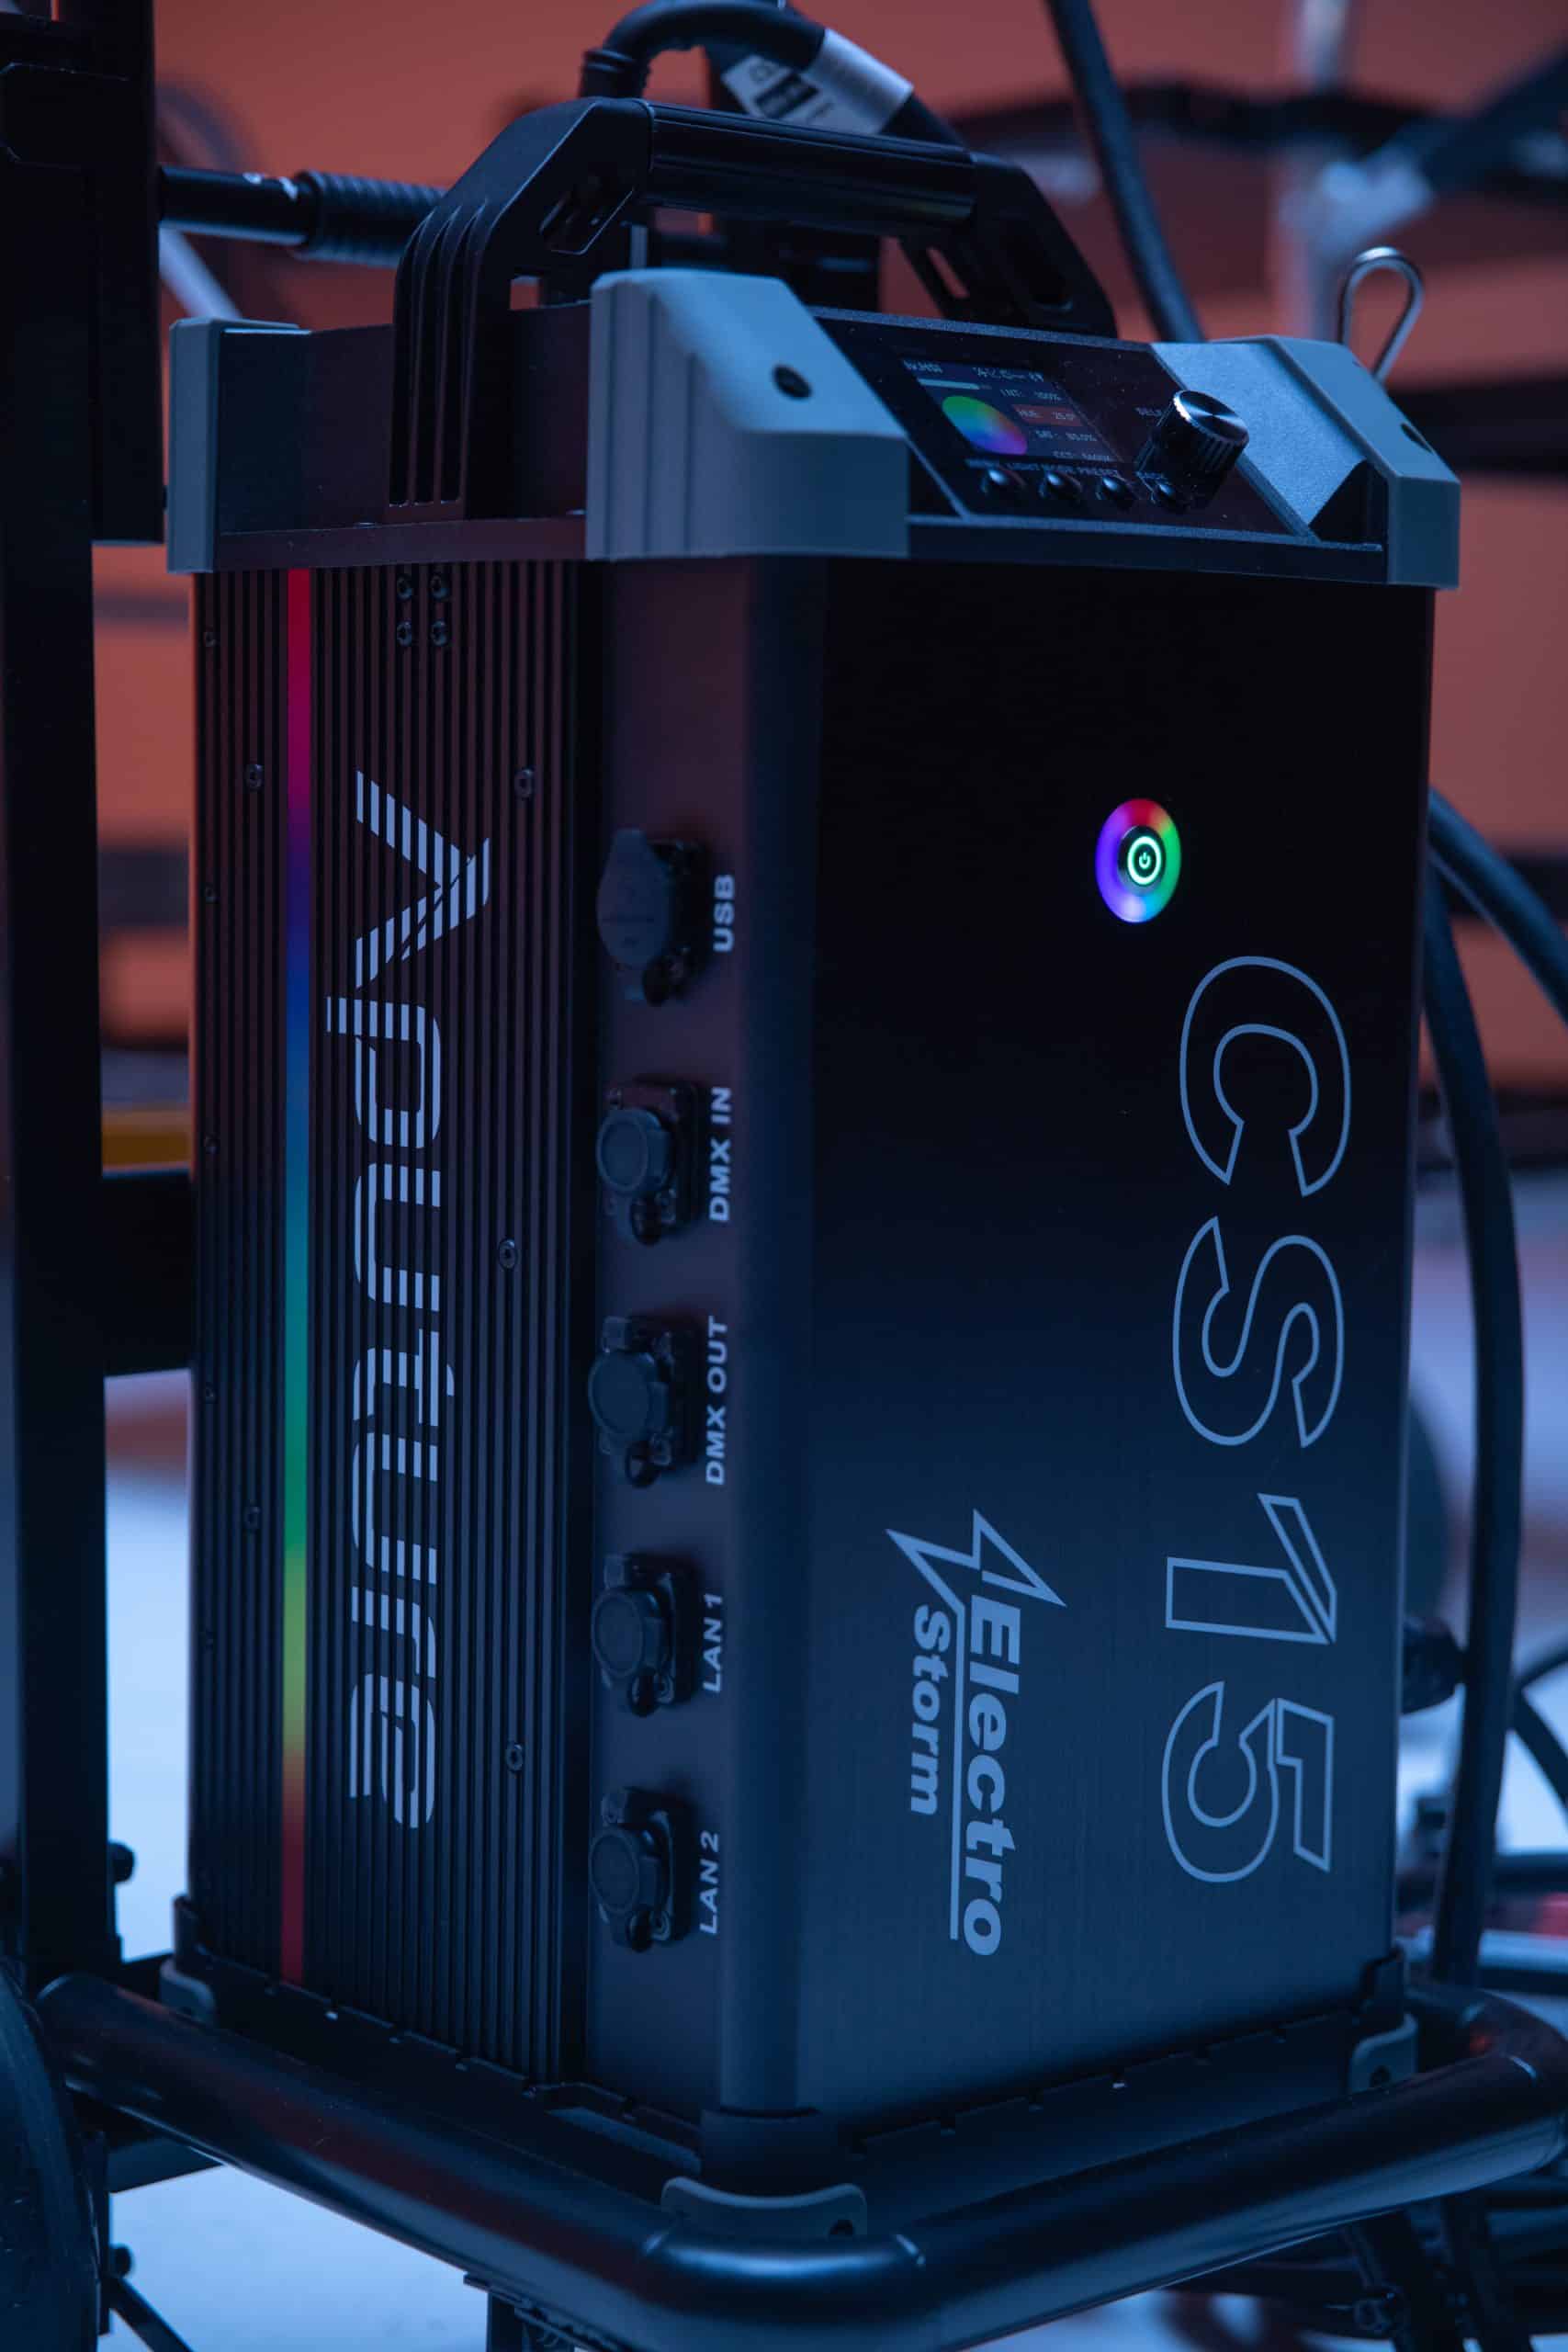
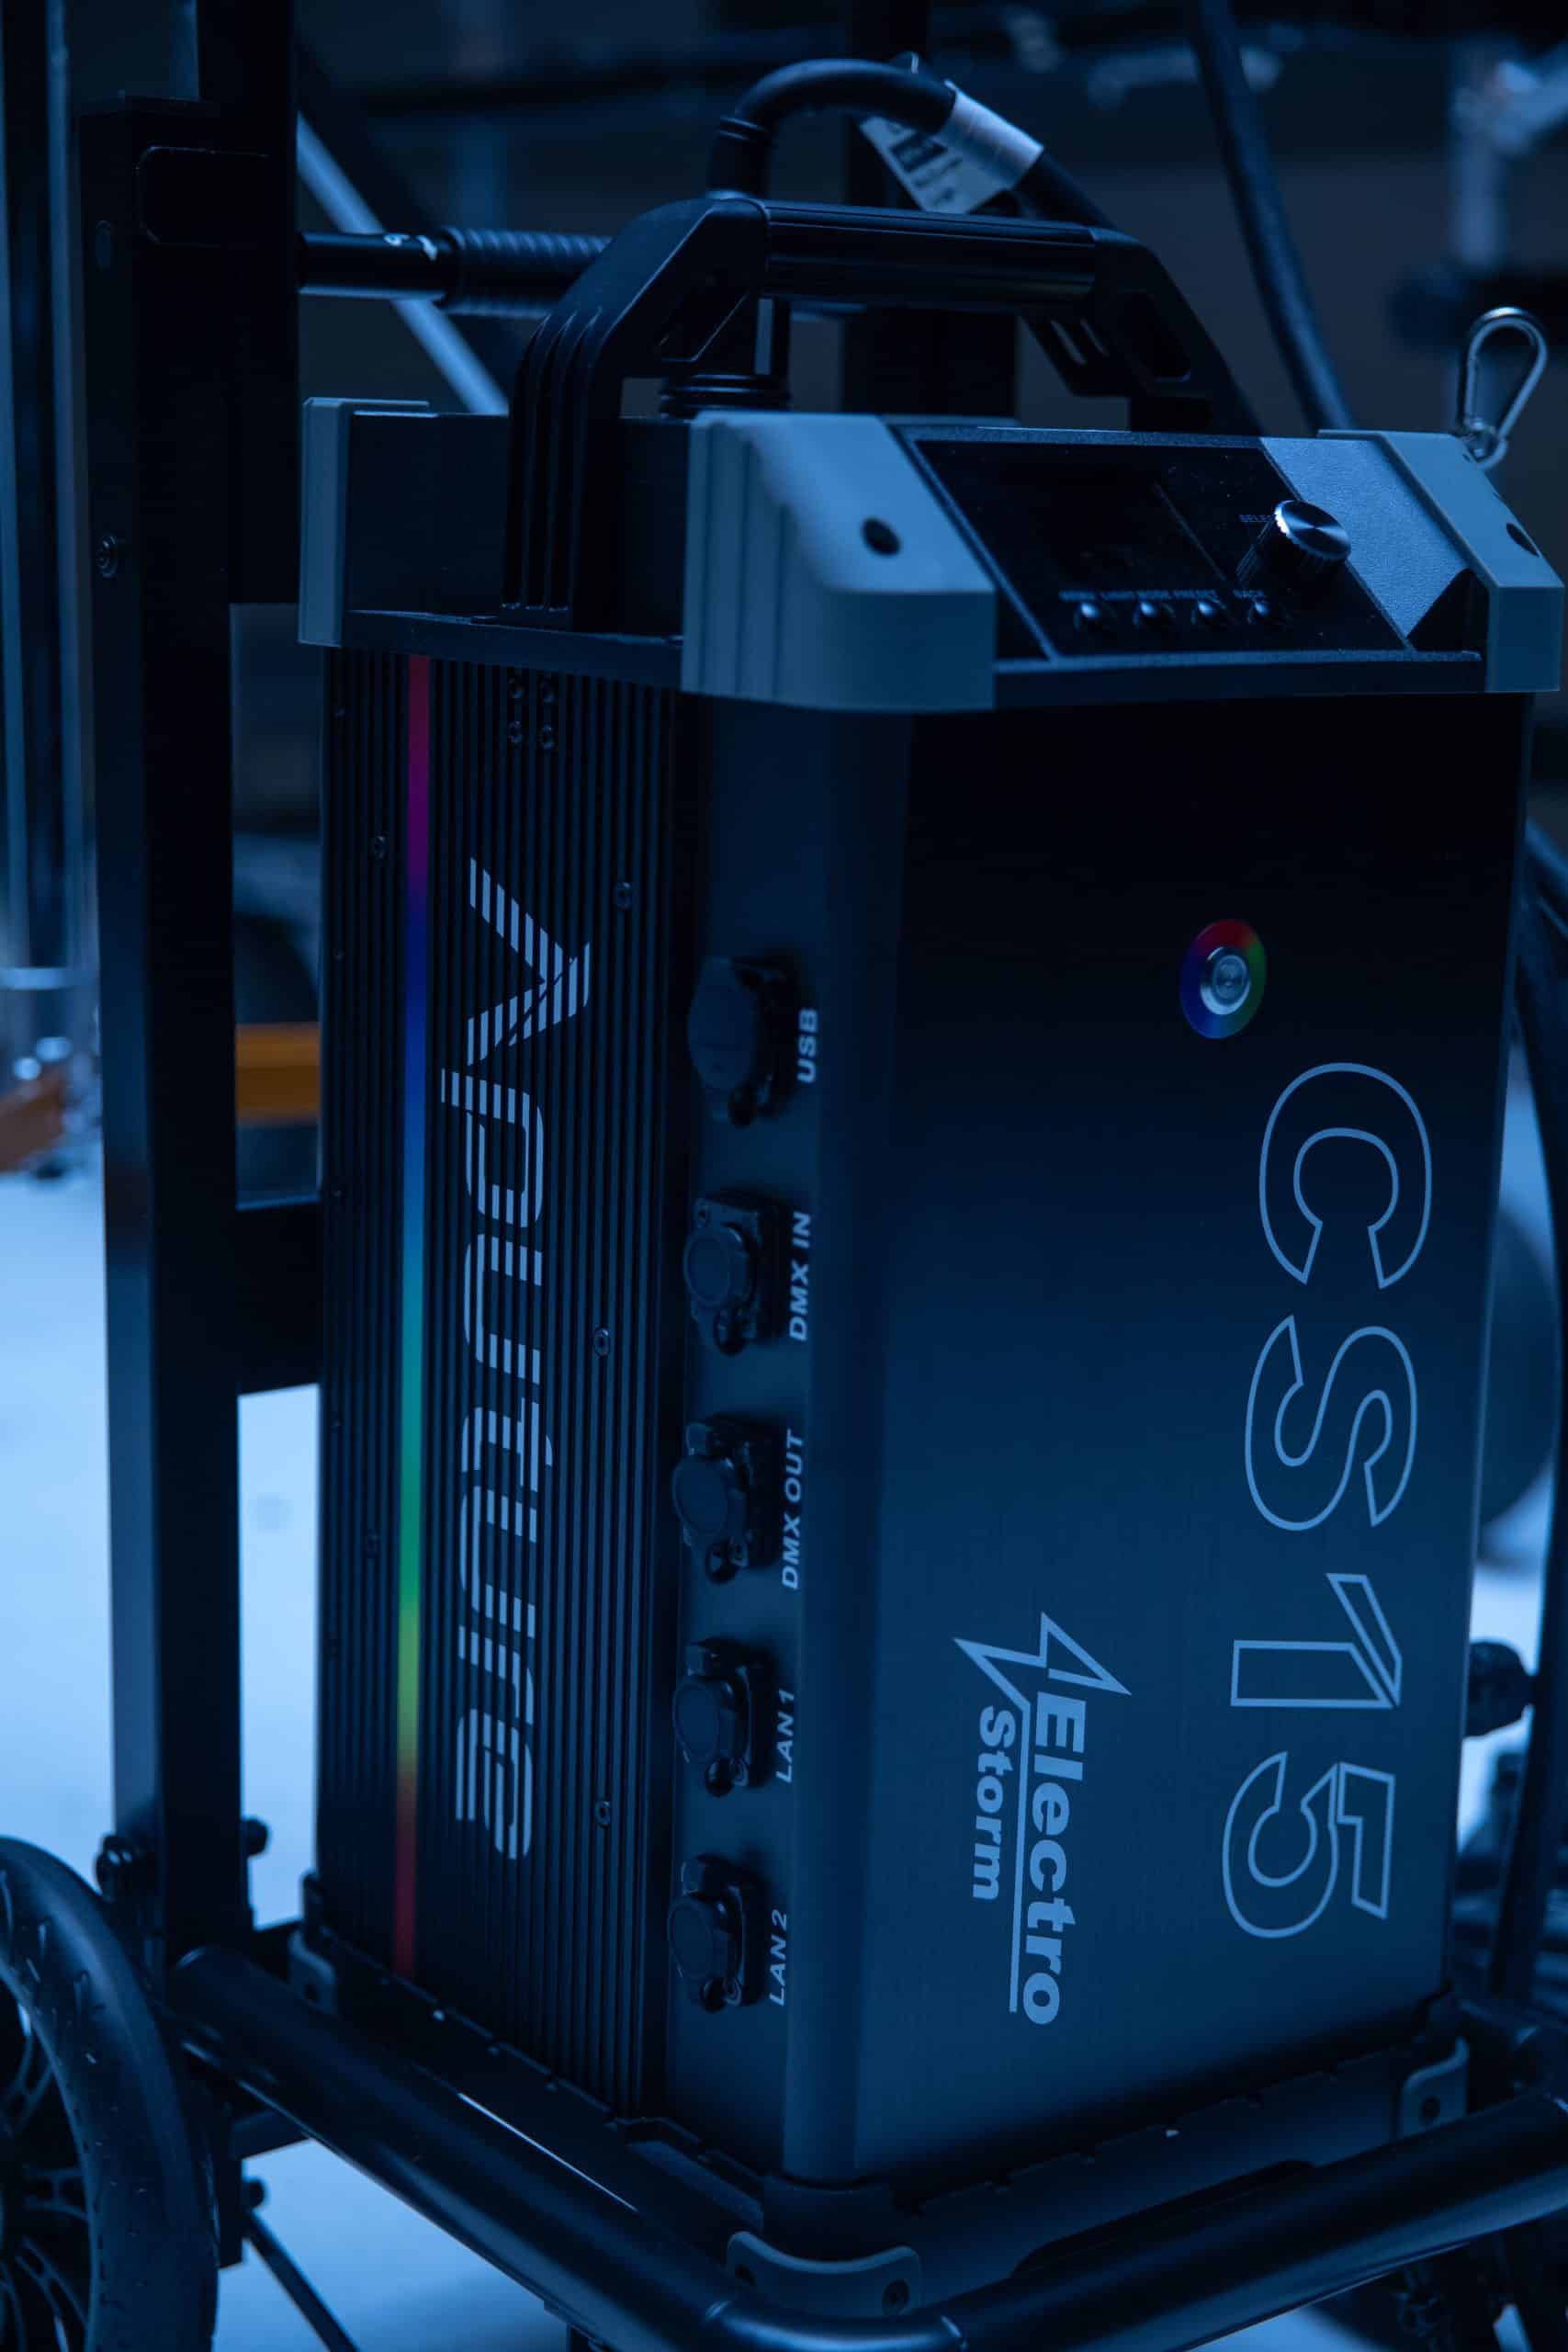
Illuminate Vegas: Aputure CS15 at F11 Rentals
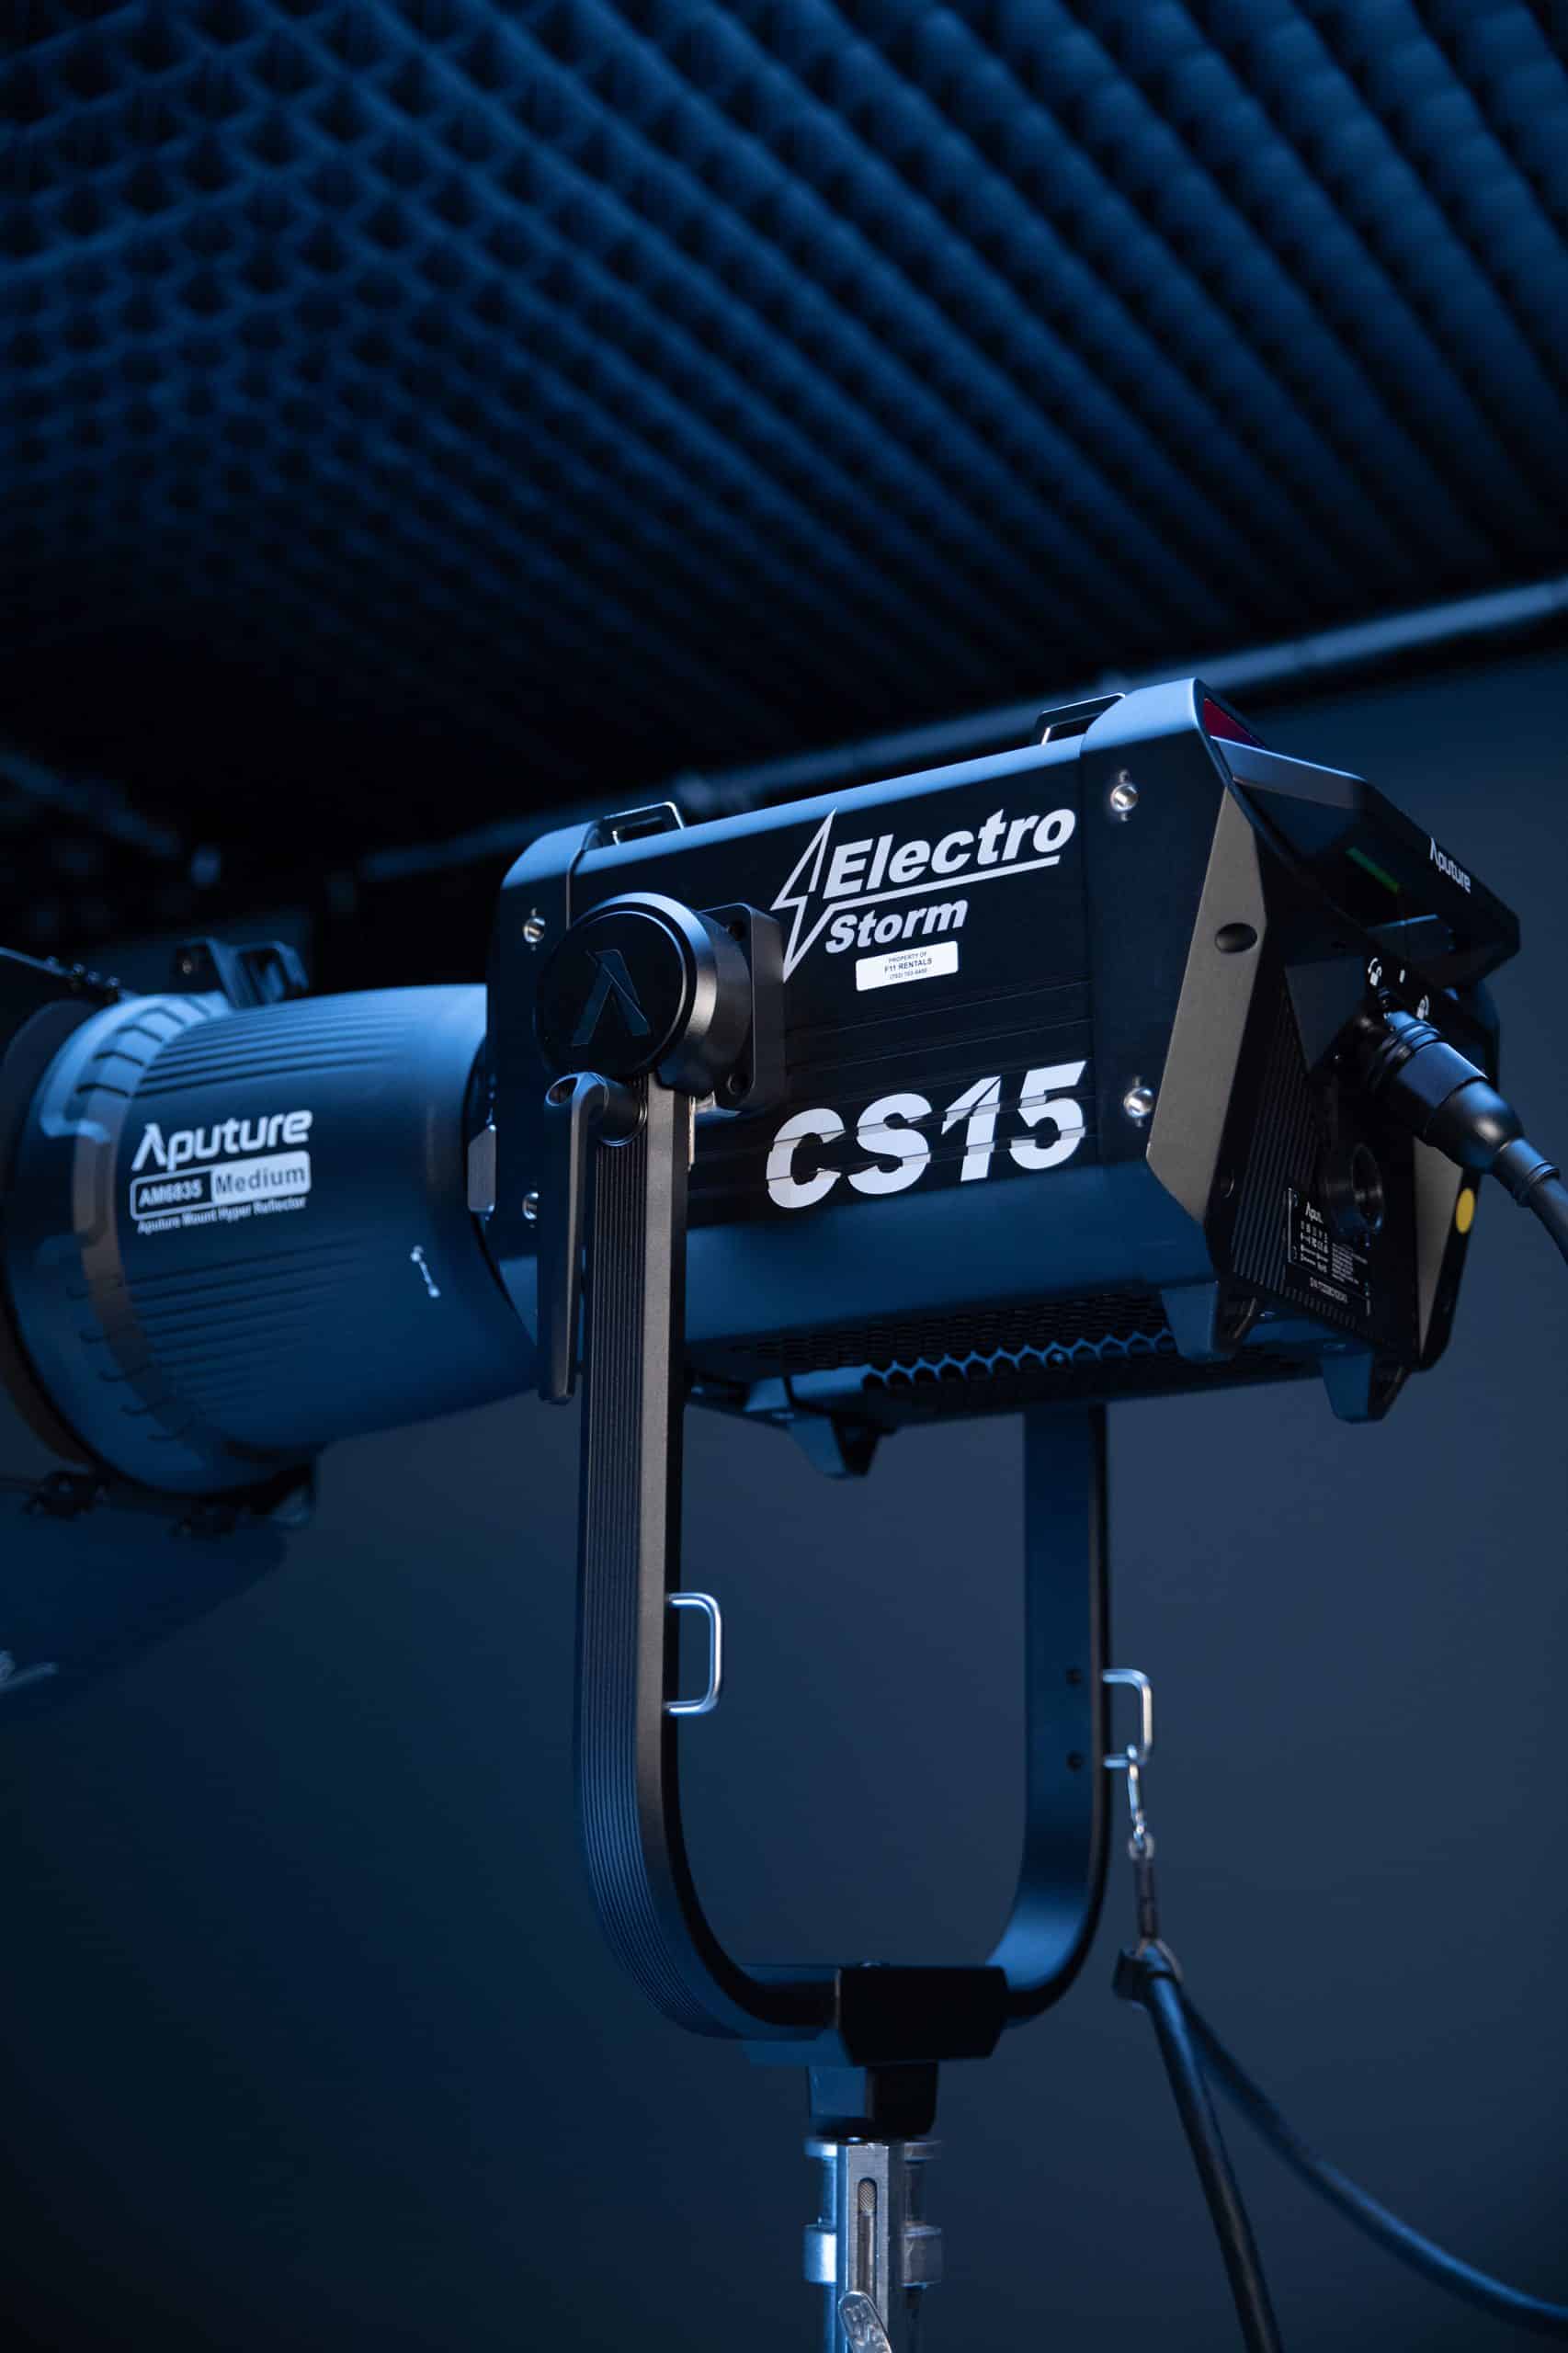
Who Needs This Powerhouse? You do! Especially if you’re working on:
- Big Films: Need to light a whole building? No sweat.
- Massive Music Videos: Epic light shows, anyone?
- Commercials: Product shots that pop like never before.
- Huge Events: Wash stages with incredible light and color.
- Anything that needs SERIOUS punch!
Super Flexible and Easy to Control
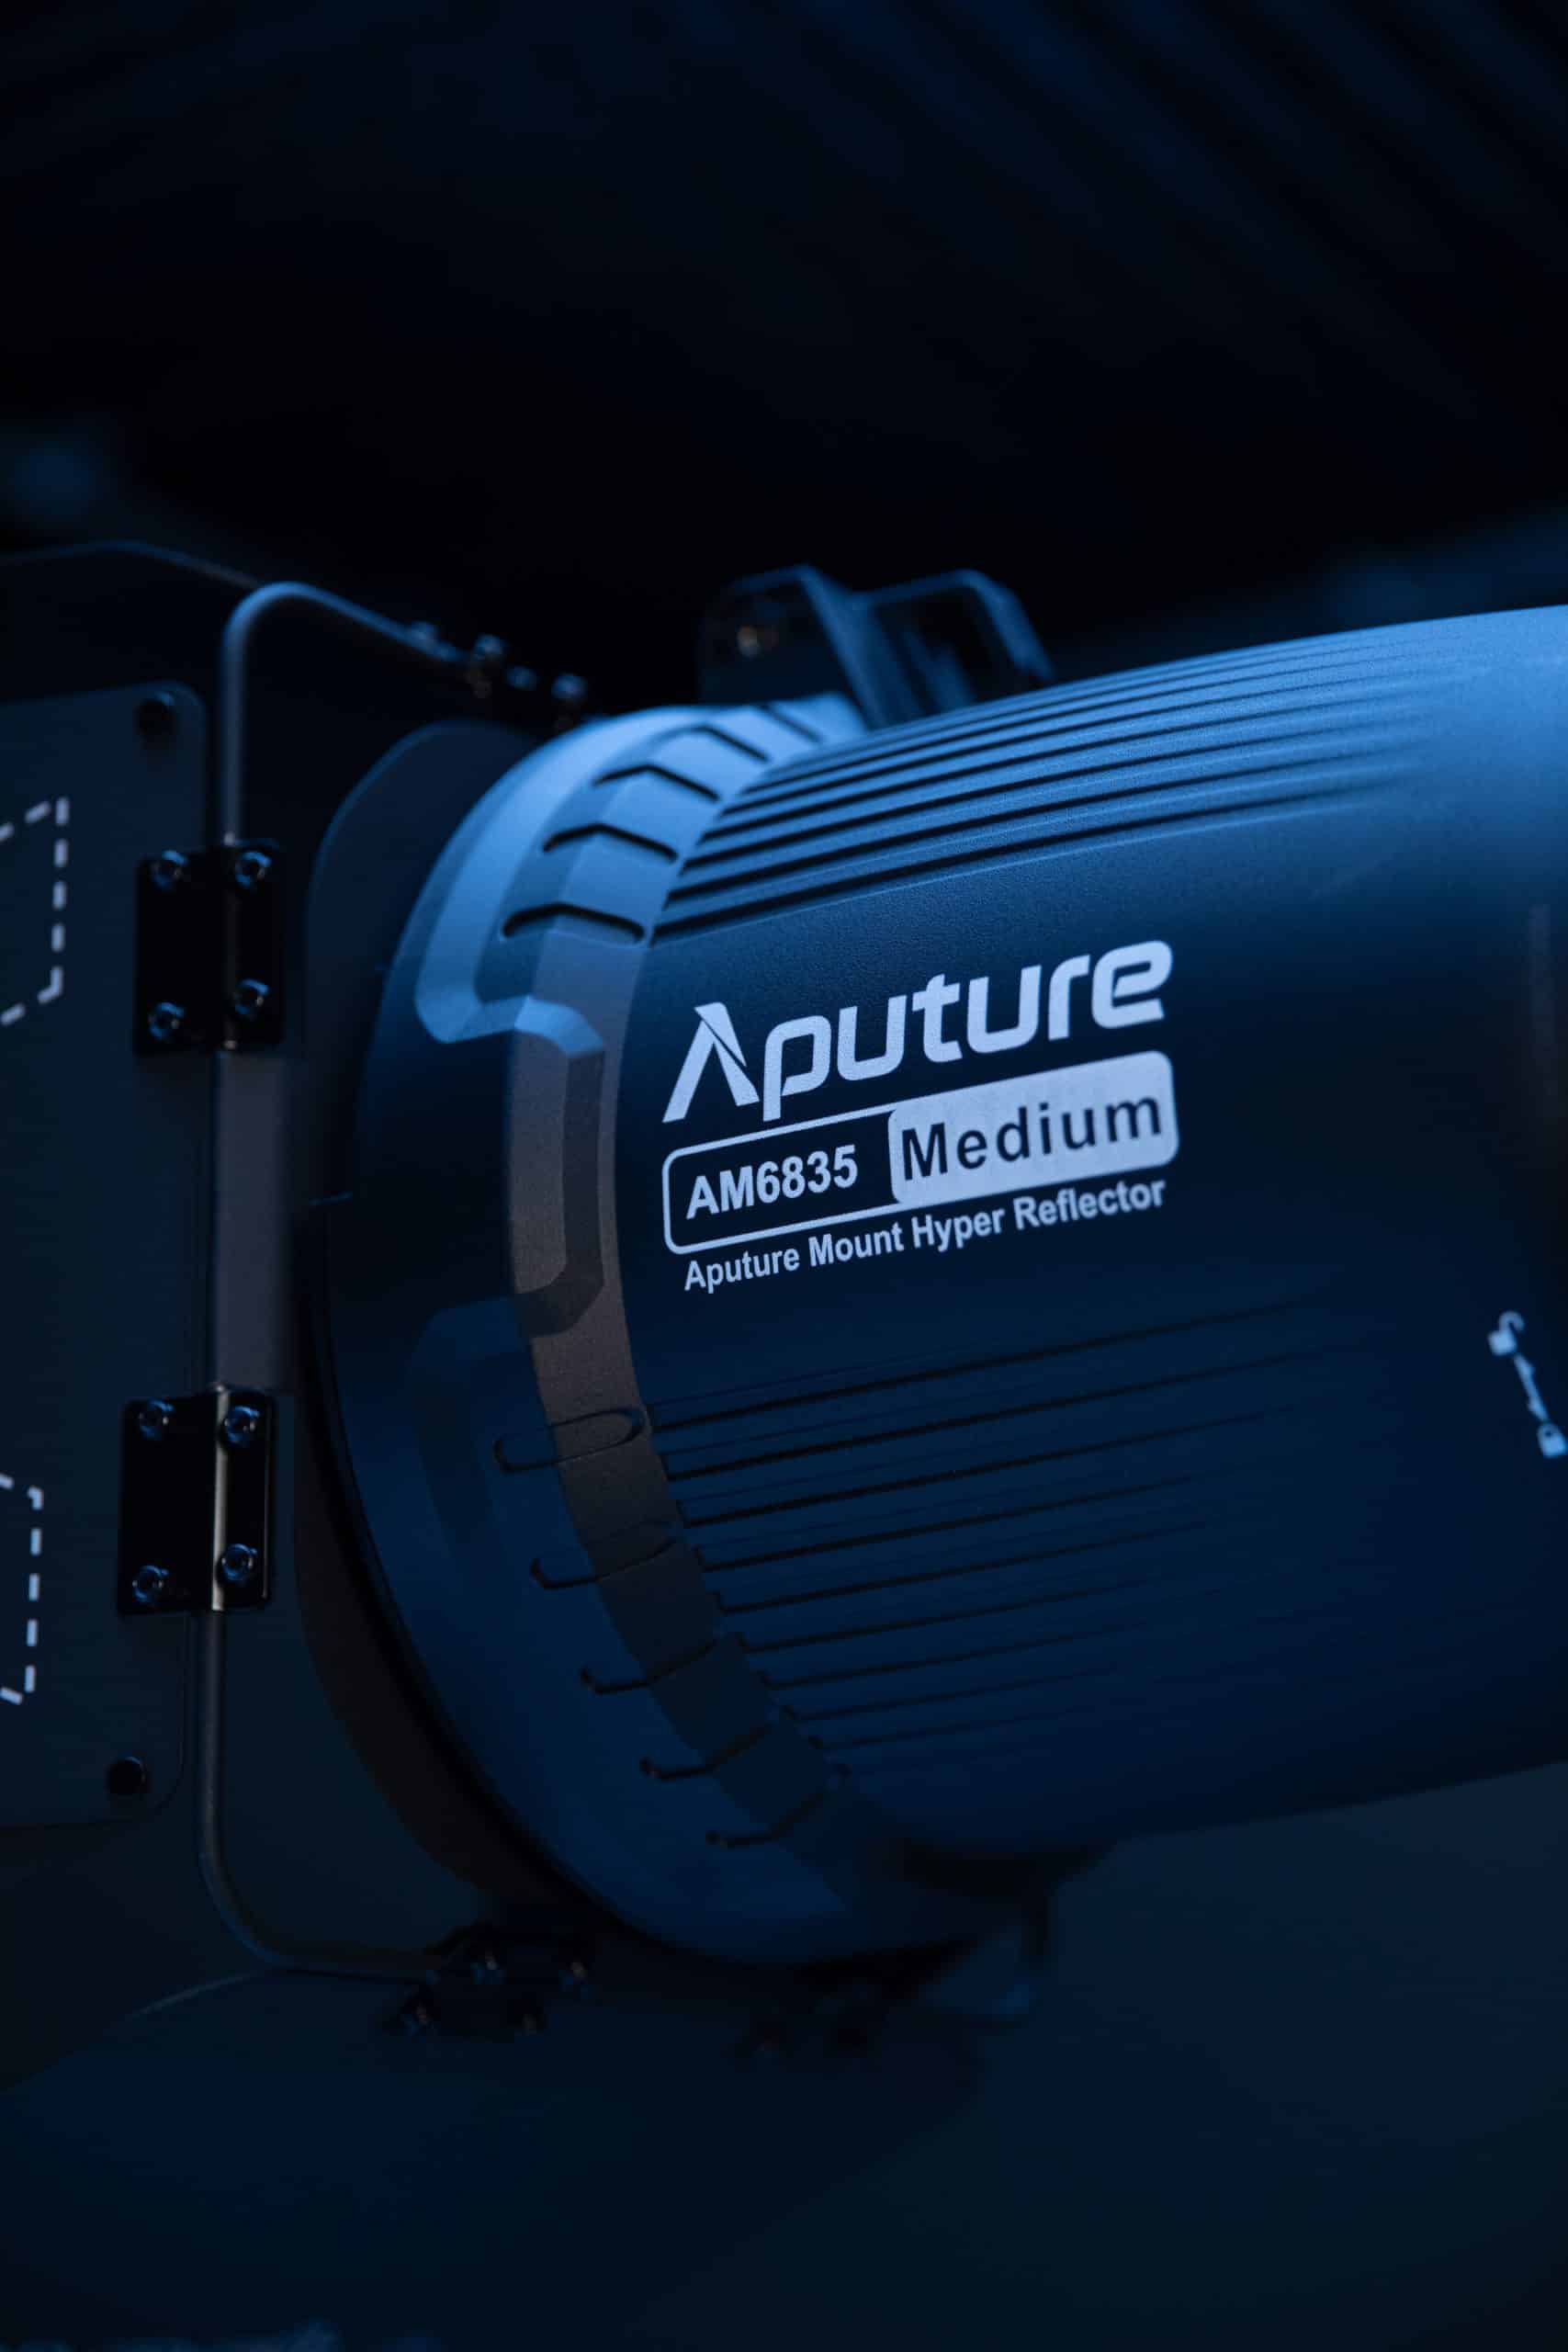
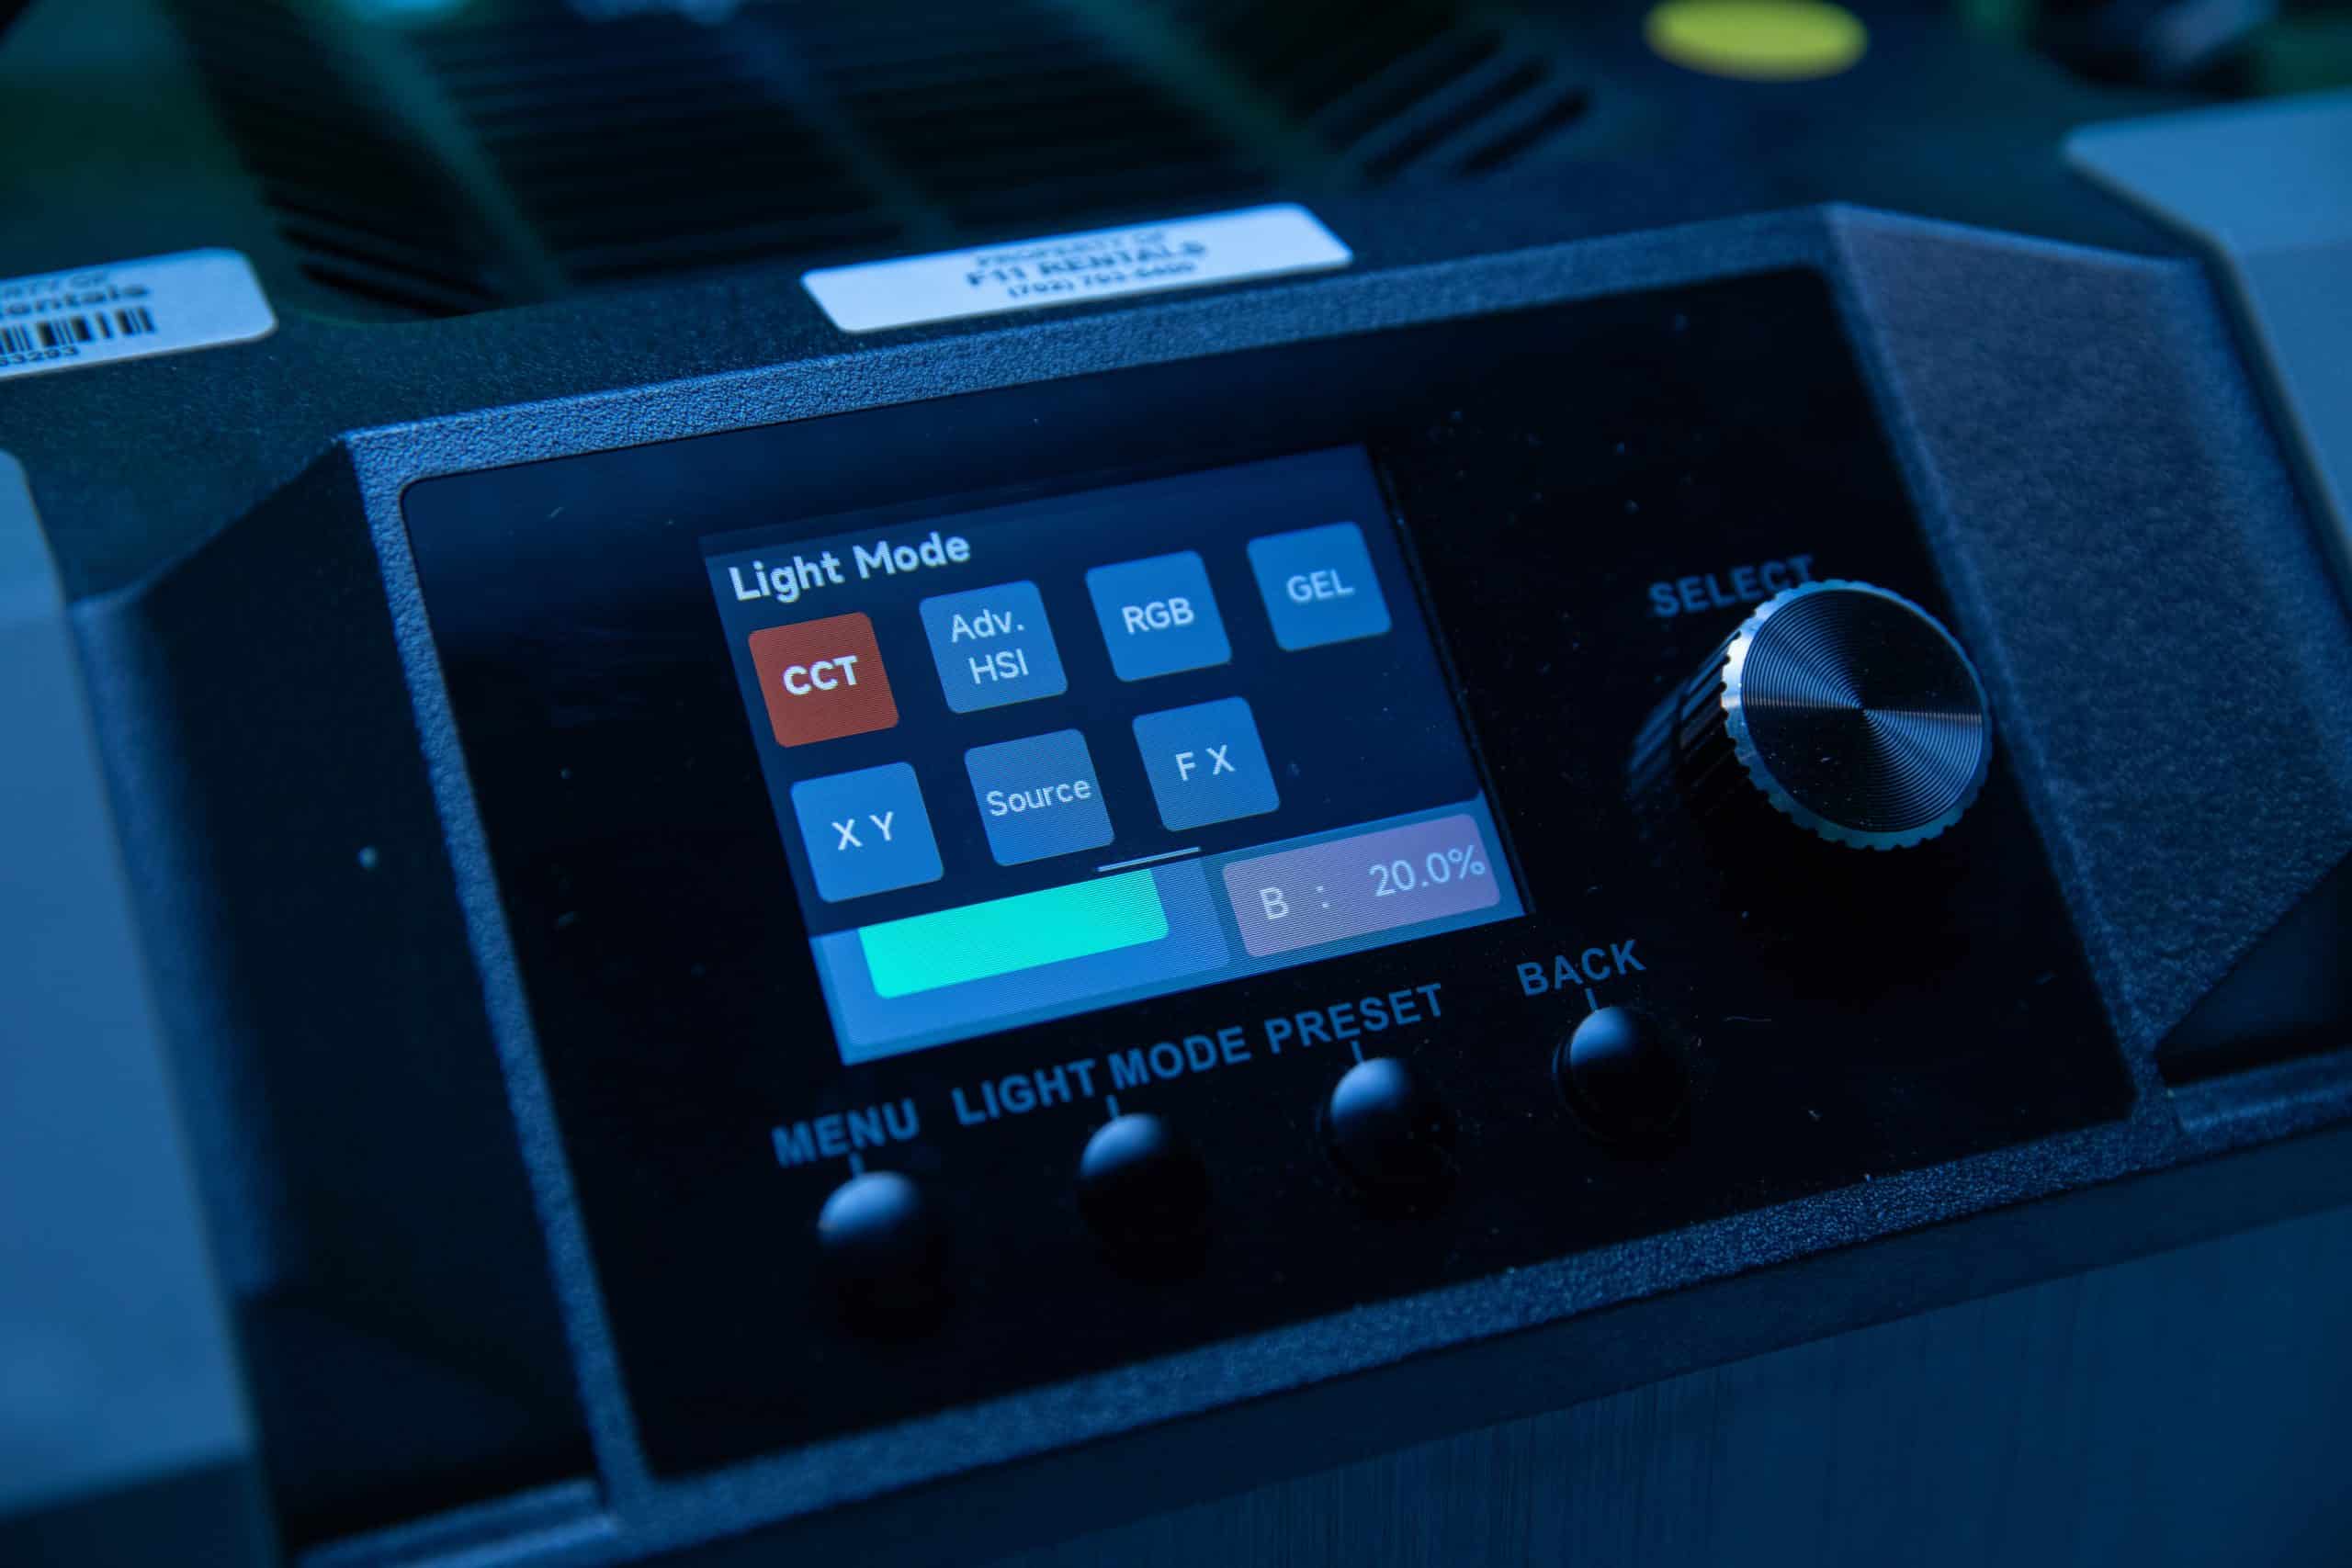
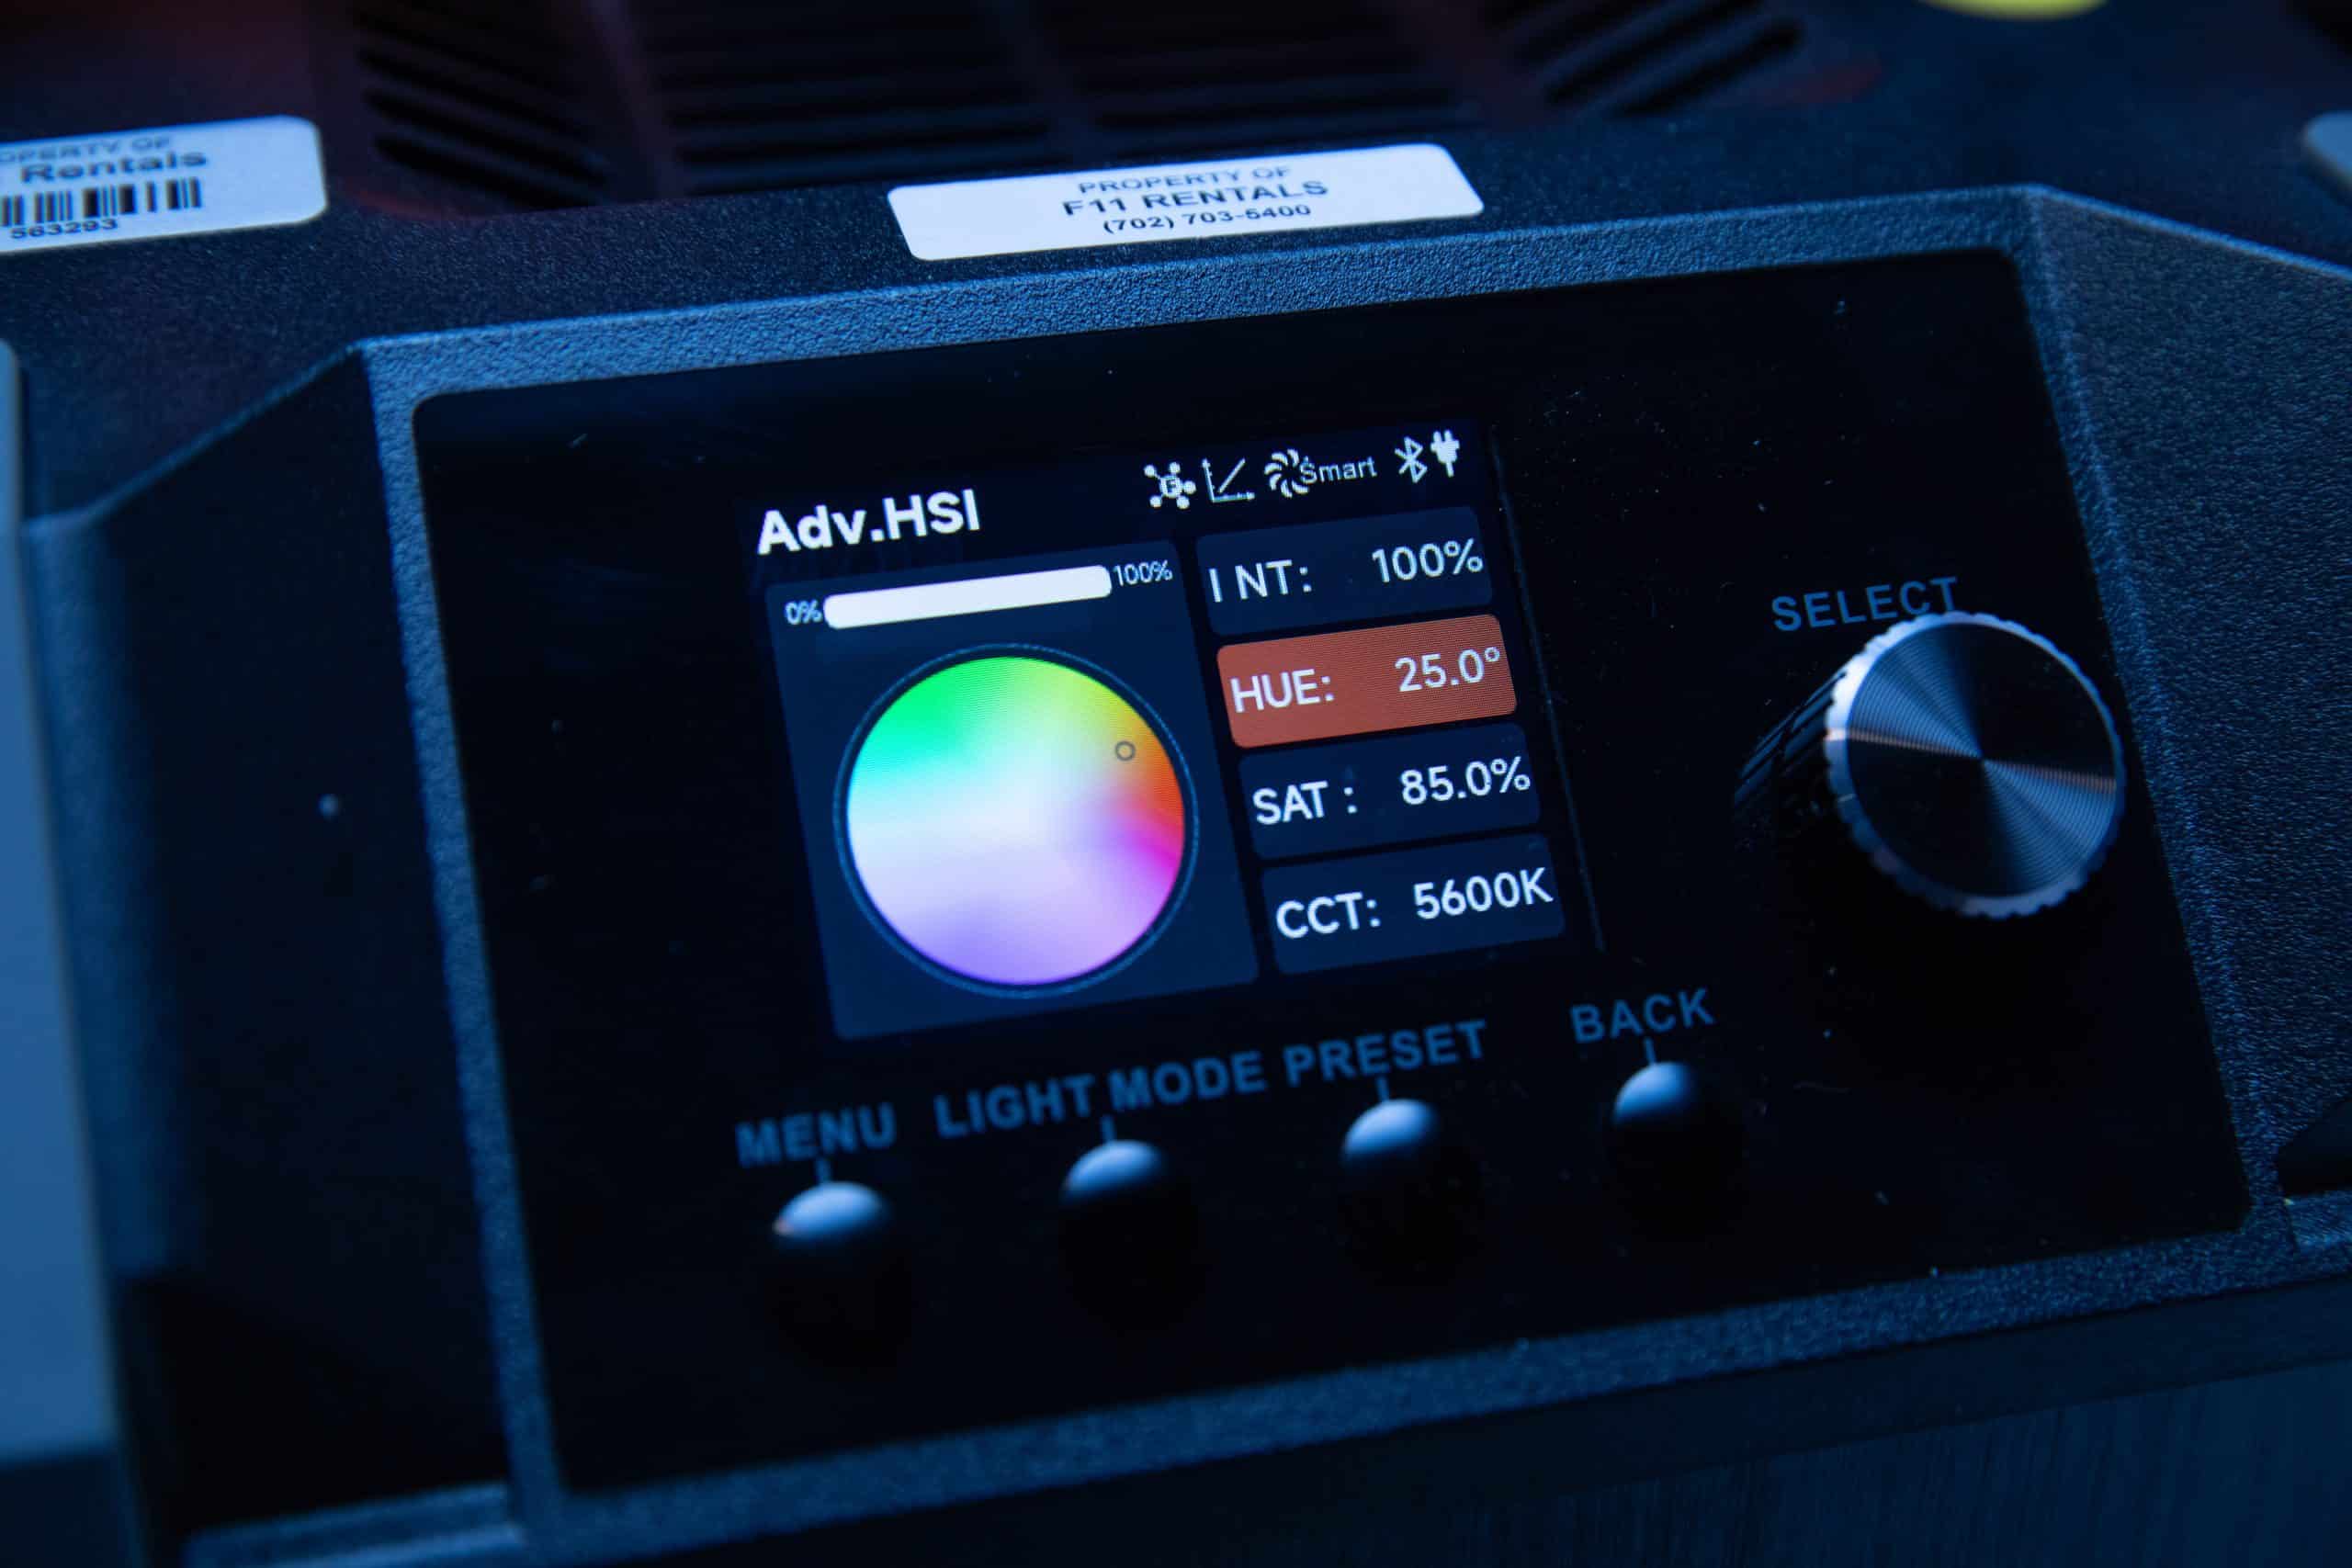
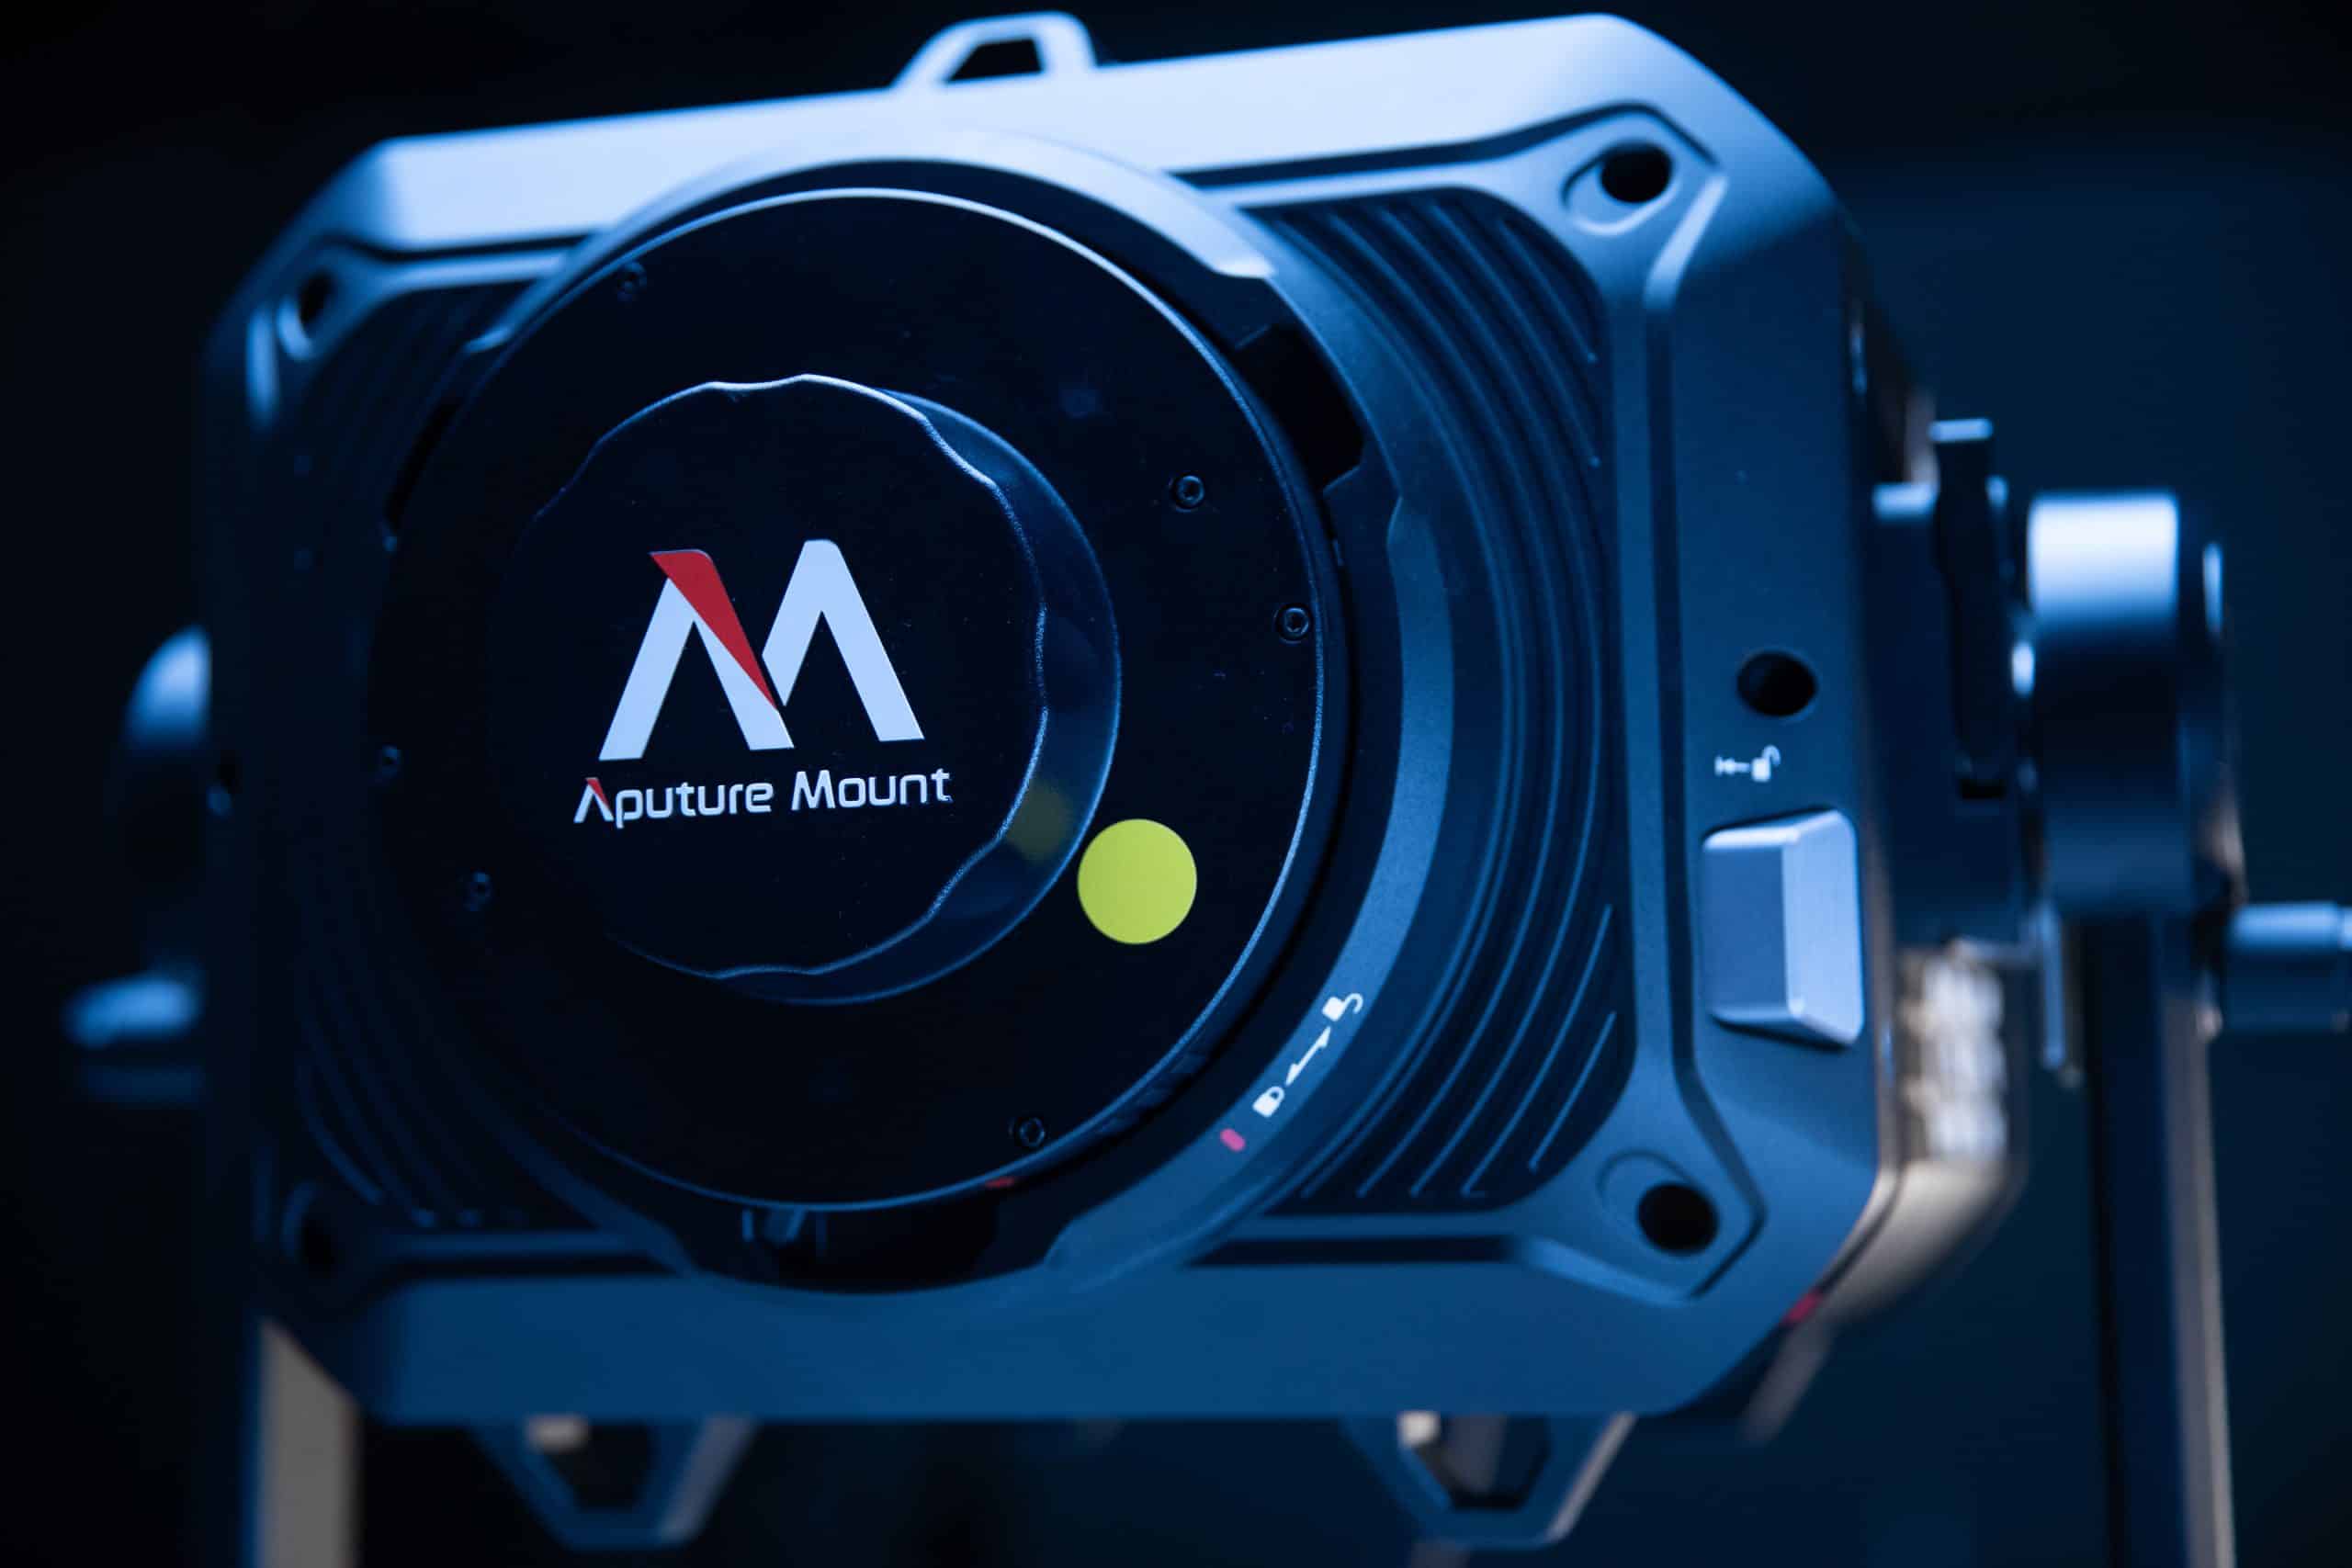
The Aputure Electro Storm CS15 is incredibly versatile thanks to its two ways to attach accessories: the common Bowens Mount and the new electronic Aputure Mount (A-Mount). The A-Mount even lets you control focus with some accessories!
Controlling the light is super easy too. You can use the buttons on the light itself, or control it wirelessly with:
- Sidus Link App: Use your phone or tablet to control it.
- LumenRadio CRMX: For strong wireless DMX control.
- Art-net & sACN via etherCON: For professional studio setups.
- 16-bit DMX512: For wired control.
Plus, it has 15 built-in lighting effects to quickly add cool looks to your scenes.
Don’t settle for less when it comes to your lighting. Visit F11 Rentals in Las Vegas today or browse our online inventory to reserve the Aputure Electro Storm CS15 for your next project. Our team is always ready to help you find the perfect gear to bring your vision to life.
Contact F11 Rentals today to learn more about the Aputure Electro Storm CS15 and our full range of professional lighting solutions!
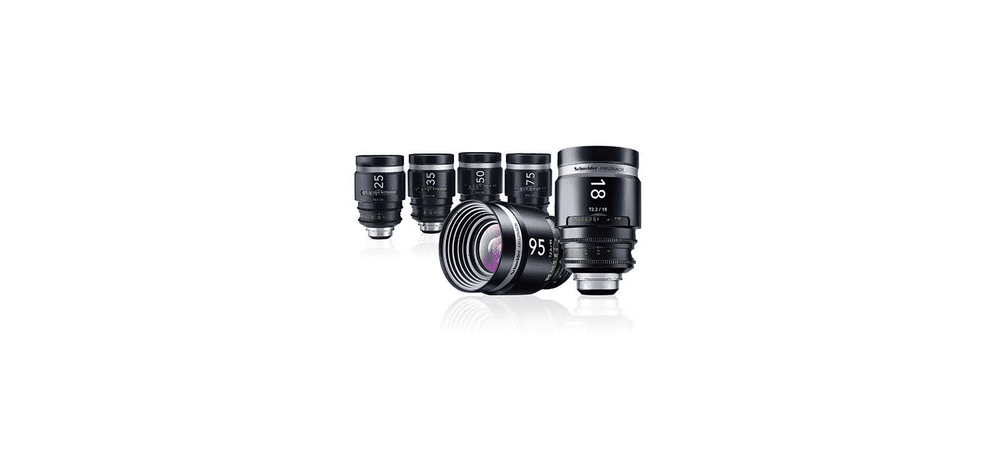
Elevate Your Indie Film Production with Top Lens Rentals from F11 Rentals
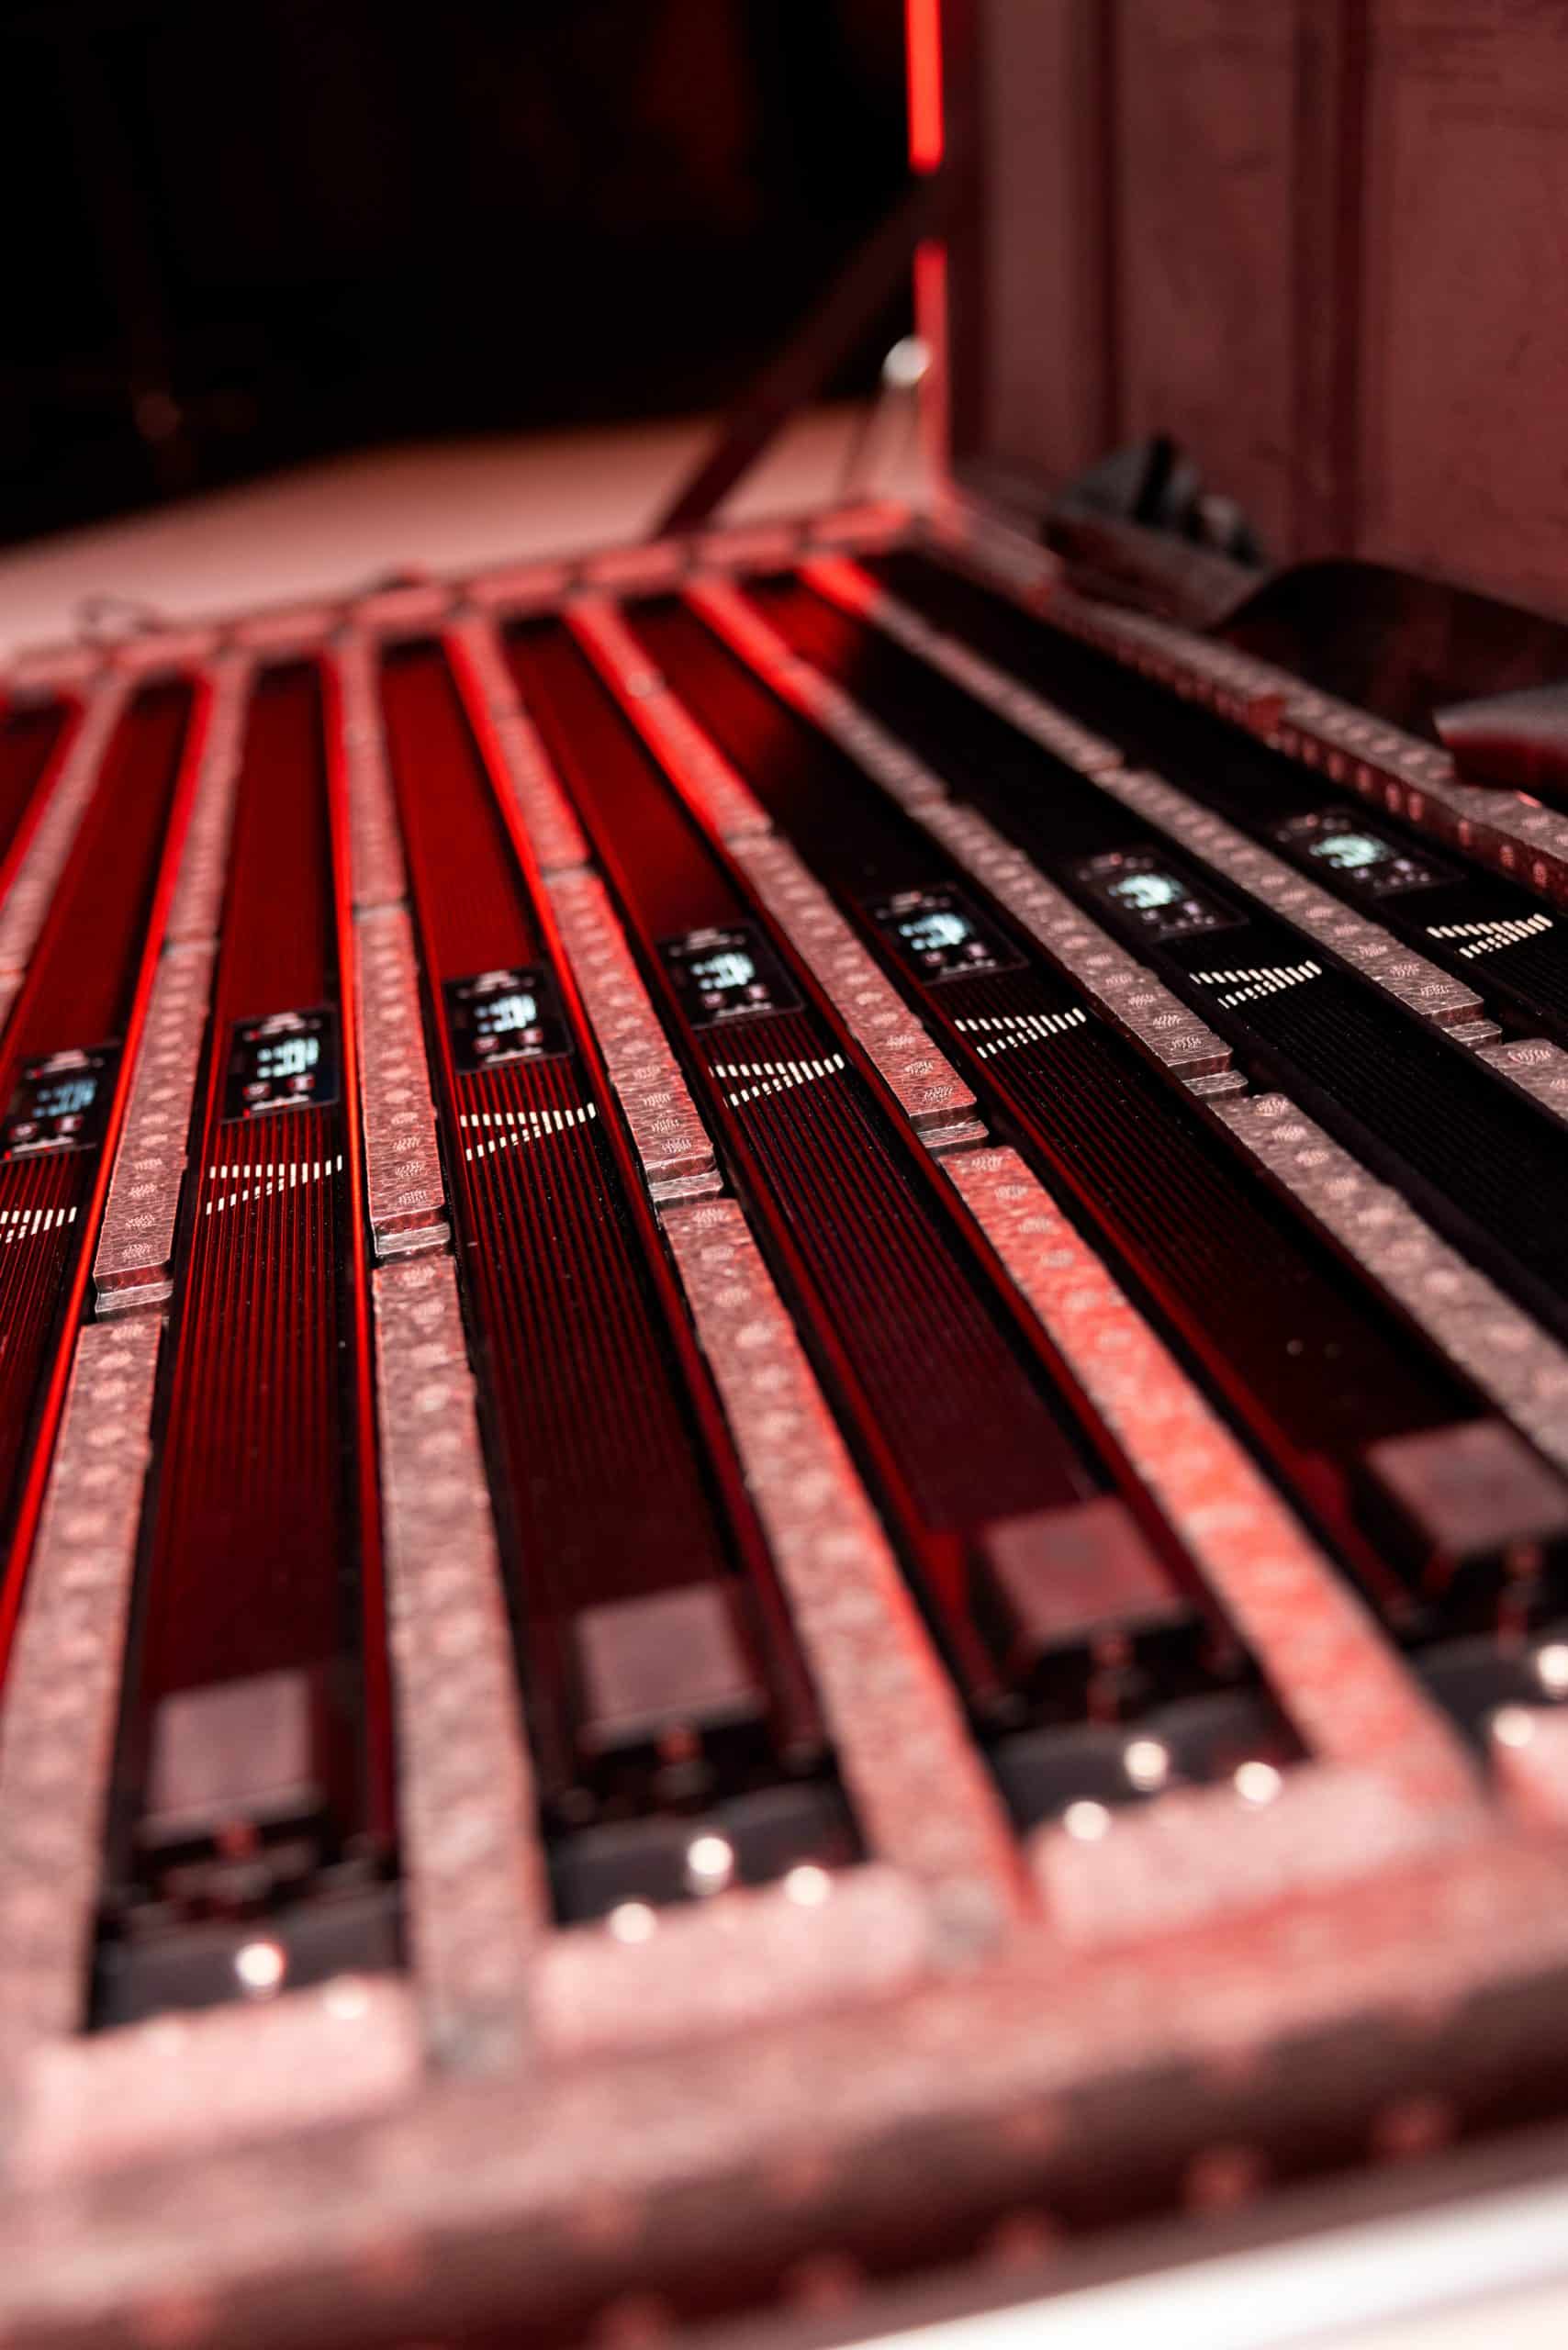
Independent filmmaking is an art that requires not just talent and vision but also the right tools. One of the most crucial choices for any filmmaker is the selection of lenses. They are the eyes of your project, capturing your story as you envision it. In Las Vegas, F11 Rentals stands out as the premier destination for procuring high-quality lenses that can bring your cinematic dreams to life. From the versatile Nisi Athena lenses to the renowned Angenieux EZ series and the versatile Sigma Cine zooms, F11 Rentals has got you covered.
Nisi Athena Prime Lenses
For those seeking to add a touch of cinematic magic to their films, the Nisi Athena lenses available at F11 Rentals are a perfect choice. Known for their exceptional clarity and color rendition, these lenses are ideal for filmmakers who demand the best in optical quality. The Athena series offers a range of focal lengths, ensuring versatility for various shooting scenarios, from intimate close-ups to expansive landscapes. Their robust build and user-friendly design make them suitable for both seasoned professionals and budding filmmakers alike.
Angenieux EZ Lens Series
The Angenieux EZ lens series is synonymous with top-tier filmmaking. These lenses are celebrated for their flexibility and superior performance. The EZ series, available at F11 Rentals, offers a modular design that can adapt to different sensor sizes, making them a smart choice for productions that might use multiple camera types. Their sharpness and contrast handling are unparalleled, providing a distinct cinematic look that can elevate any indie project. Whether you’re shooting a drama, documentary, or commercial, the Angenieux EZ lenses will not disappoint.
Sigma Cine Zooms
Sigma Cine zoom lenses are a testament to high-quality filmmaking at an accessible price point. F11 Rentals offers a range of Sigma Cine zooms known for their optical excellence and consistency across the zoom range. These lenses are a boon for indie filmmakers who need flexibility without compromising on quality. Their robust construction and smooth zoom mechanism make them ideal for dynamic shooting conditions. With Sigma Cine zooms, you can achieve breathtaking visuals without breaking your budget.
In the world of independent film production, the choice of lenses can make or break your project. At F11 Rentals in Las Vegas, we understand this. That’s why we offer a curated selection of lenses, including the Nisi Athena, Angenieux EZ, and Sigma Cine zooms, to help you realize your vision. With our gear, your story can be told exactly how you imagined it – with clarity, precision, and a touch of cinematic flair. Visit F11Rentals.com to explore our lens options and take your film to the next level.